
Cascading Dropdown List In ASP.Net MVC A Sample Demonstration
Last couple of weeks I found a good number of requests from my trainees and some .NET developers. They request me for sample code or a demonstration of cascading dropdown list in ASP.NET MVC. That’s why, I am writing this article. Cascading dropdown list is actually a parent child dropdown list. In this article I showed two dropdown lists one is category dropdown list and other is product dropdown list. Product dropdown list will be populated on the basis of category (selected category).
Let’s implement cascading dropdown list in ASP.NET MVC
Tools and Technology used
I used following tools and technology to develop the project –
- Visual Studio 2013
- Visual C#
- ASP.NET MVC 5
- Entity Framework 6
- JQuery Ajax
Step 1: Create a ASP.NET MVC Project
- Open visual studio and then go
- File -> Project -> ASP.NET Web Application
- Create an ASP.NET MVC project
Step 2: Install Json.NET
- Click right button on Project -> NuGet Packages
- Search Json.NET
- Select and install Json.NET
Keep note that in this moment, your internet connection must on.
Step 3: Create a local database
- Click right button on App_Data folder -> Select Add -> SQL Server Database.
- Type Item name as InventoryDB. You can choose any type you want. You will see Inventory.mdf file is created in App_Data folder
Step 4: Modify connection string. Modify connection string as below because you are using localdb.
<connectionStrings>
  <add name="DefaultConnection" connectionString="Data Source=(LocalDb)\v11.0;AttachDbFilename=|DataDirectory|\InventoryDB.mdf;Initial Catalog=InventoryDB;Integrated Security=True" providerName="System.Data.SqlClient" />
</connectionStrings>
Step 5: Create a model for the application.
Create a model class name Category in model folder
public class Category
{
    public int Id { get; set; }
    public string Name { get; set; }
    public List<Product> Products { get; set; }
}
Create a model class name Product in model folder
public class Product
{
    public int Id { get; set; }
    public string Name { get; set; }

    public int CategoryId { get; set; }

    [ForeignKey("CategoryId")]
    public virtual Category Category { get; set; }
}
Create a model name Item in model folder
public class Item
{
    public int Id { get; set; }
    public string Name { get; set; }

    [Display(Name = "Category")]
    public int CategoryId { get; set; }
    [ForeignKey("CategoryId")]
    public virtual Category Category { get; set; }

    [Display(Name = "Products")]
    public int ProductId { get; set; }
    [ForeignKey("ProductId")]
    public Product Product { get; set; }
}
Step 6: Create Context Class
Create a context class in model folder name InventoryDBContext as follows
public class InventoryDBContext : DbContext
{
    public InventoryDBContext()
        : base("DefaultConnection")
    {

    }

    public DbSet<Category> Categories { get; set; }
    public DbSet<Product> Products { get; set; }
    public DbSet<Item> Items { get; set; }
}
Step 7: Enable Migration
- Go to Tools-> NuGet Package Manager -> Package Manger Console
- Type the following command in package manager console to enable migration
PM> Enable-Migrations -ContextTypeName InventoryDBContext
After pressing enter you will see a class name Configuration is created in Migrations folder with some codes. Now add seed data in Seed method of Configuration class in Migrations folder as follows.
internal sealed class Configuration : DbMigrationsConfiguration<Web.Mahedee.net.Models.InventoryDBContext>
{
    public Configuration()
    {
        AutomaticMigrationsEnabled = false;
    }

    protected override void Seed(Web.Mahedee.net.Models.InventoryDBContext context)
    {
        context.Categories.AddOrUpdate(
            p => p.Name,
            new Category
            {
                Name = "Electronics",
                Products = new List<Product> {
                    new Product{Name = "Mobile"},
                    new Product{Name = "Laptop"},
                    new Product{Name = "Television"},
                    new Product{Name = "Camera"}
                }

            },

            new Category
            {
                Name = "Men ware",
                Products = new List<Product>
                {
                    new Product{Name = "Footware"},
                    new Product{Name = "Clothings"},
                    new Product{Name = "Watches"},
                    new Product{Name = "Hand bag"},
                    new Product{Name = "Sun Glass"}
                }
            },

            new Category
            {
                Name = "Baby & Kids",
                Products = new List<Product>
                {
                    new Product{Name = "Baby footware"},
                    new Product{Name = "Kids clothigs"},
                    new Product{Name = "Baby care"}
                }
            },

             new Category
            {
                Name = "Books",
                Products = new List<Product>
                {
                    new Product{Name = "Introduction to C#"},
                    new Product{Name = "ASP.NET MVC Begineer to Professional"},
                    new Product{Name = "ASP.NET Web API Security"},
                    new Product{Name = "SPA with ASP.NET MVC"}
                }
            }

            );
    }
}
Step 8: Add Migration and Update database
In package manager console write the following command to add a migration.
PM> add-migration firstmigration
A file will be created in Migrations folder something like below. File Name: 201512041037292_firstmigration
Update the file, in AddForeignKey section and set false for cascadeDelete as follows.
public partial class firstmigration : DbMigration
 {
     public override void Up()
     {
         DropForeignKey("dbo.Categories", "Item_Id", "dbo.Items");
         DropForeignKey("dbo.Products", "Item_Id", "dbo.Items");
         DropIndex("dbo.Categories", new[] { "Item_Id" });
         DropIndex("dbo.Products", new[] { "Item_Id" });
         CreateIndex("dbo.Items", "CategoryId");
         CreateIndex("dbo.Items", "ProductId");

         AddForeignKey("dbo.Items", "CategoryId", "dbo.Categories", "Id", cascadeDelete: false);
         AddForeignKey("dbo.Items", "ProductId", "dbo.Products", "Id", cascadeDelete: false);

         DropColumn("dbo.Categories", "Item_Id");
         DropColumn("dbo.Products", "Item_Id");
     }

     public override void Down()
     {
         AddColumn("dbo.Products", "Item_Id", c => c.Int());
         AddColumn("dbo.Categories", "Item_Id", c => c.Int());
         DropForeignKey("dbo.Items", "ProductId", "dbo.Products");
         DropForeignKey("dbo.Items", "CategoryId", "dbo.Categories");
         DropIndex("dbo.Items", new[] { "ProductId" });
         DropIndex("dbo.Items", new[] { "CategoryId" });
         CreateIndex("dbo.Products", "Item_Id");
         CreateIndex("dbo.Categories", "Item_Id");
         AddForeignKey("dbo.Products", "Item_Id", "dbo.Items", "Id");
         AddForeignKey("dbo.Categories", "Item_Id", "dbo.Items", "Id");
     }
 }
Write the following command in package manager console to update database.
PM> update-database –Verbose
Step 9: Add Items Controller
- Right click on Controllers folder -> Add -> Controller
- Select MVC 5 Controller with views using Entity Framework and the click Add
- Select Item as Model class and InventoryDBContext as context class and click Add button.
- ItemsController and Views will be created automatically.
Step 10: Update Items controller
Modify the following action of Items controller
public ActionResult Create()
{
    List<Category> lstCategory = db.Categories.ToList();
    lstCategory.Insert(0, new Category { Id = 0, Name = "--Select Category--" });

    List<Product> lstProduct = new List<Product>();
    ViewBag.CategoryId = new SelectList(lstCategory, "Id", "Name");
    ViewBag.ProductId = new SelectList(lstProduct, "Id", "Name");
    return View();
}
Add the following action in the Items controller
public JsonResult GetProductsByCategoryId(int id)
{
    List<Product> products = new List<Product>();
    if (id > 0)
    {
        products = db.Products.Where(p => p.CategoryId == id).ToList();

    }
    else
    {
        products.Insert(0, new Product { Id = 0, Name = "--Select a category first--" });
    }
    var result = (from r in products
                  select new
                  {
                      id = r.Id,
                      name = r.Name
                  }).ToList();

    return Json(result, JsonRequestBehavior.AllowGet);
}
Step 5: Modify the Create View of Items folder
Modify the Create View as follows.
@model Web.Mahedee.net.Models.Item

@{
    ViewBag.Title = "Create";
}

<script type="text/javascript" src="http://ajax.googleapis.com/ajax/libs/jquery/1.4.1/jquery.min.js"></script>
<script type="text/javascript">
    $(function () {
        if ($("#CategoryId").val() == '0') {
            var productDefaultValue = "<option value='0'>--Select a category first--</option>";
            $("#ProductId").html(productDefaultValue).show();
        }

        $("#CategoryId").change(function () {
            var selectedItemValue = $(this).val();

            var ddlProducts = $("#ProductId");
            $.ajax({
                cache: false,
                type: "GET",
                url: '@Url.Action("GetProductsByCategoryId", "Items")',
                data: { "id": selectedItemValue },
                success: function (data) {
                    ddlProducts.html('');
                    $.each(data, function (id, option) {
                        ddlProducts.append($('<option></option>').val(option.id).html(option.name));
                    });
                },
                error: function (xhr, ajaxOptions, thrownError) {
                    alert('Found error to load product!!.');
                }
            });
        });
    });
</script>

<h2>Create</h2>


@using (Html.BeginForm())
{
    @Html.AntiForgeryToken()

    <div class="form-horizontal">
        <h4>Item</h4>
        <hr />
        @Html.ValidationSummary(true, "", new { @class = "text-danger" })
        <div class="form-group">
            @Html.LabelFor(model => model.CategoryId, "Category", htmlAttributes: new { @class = "control-label col-md-2" })
            <div class="col-md-10">
                @Html.DropDownList("CategoryId", null, htmlAttributes: new { @class = "form-control" })
                @Html.ValidationMessageFor(model => model.CategoryId, "", new { @class = "text-danger" })
            </div>
        </div>

        <div class="form-group">
            @Html.LabelFor(model => model.ProductId, "Product", htmlAttributes: new { @class = "control-label col-md-2" })
            <div class="col-md-10">
                @Html.DropDownList("ProductId", null, htmlAttributes: new { @class = "form-control" })
                @Html.ValidationMessageFor(model => model.ProductId, "", new { @class = "text-danger" })
            </div>
        </div>

        <div class="form-group">
            @Html.LabelFor(model => model.Name, htmlAttributes: new { @class = "control-label col-md-2" })
            <div class="col-md-10">
                @Html.EditorFor(model => model.Name, new { htmlAttributes = new { @class = "form-control" } })
                @Html.ValidationMessageFor(model => model.Name, "", new { @class = "text-danger" })
            </div>
        </div>

        <div class="form-group">
            <div class="col-md-offset-2 col-md-10">
                <input type="submit" value="Create" class="btn btn-default" />
            </div>
        </div>
    </div>
}

<div>
    @Html.ActionLink("Back to List", "Index")
</div>

@section Scripts {
    @Scripts.Render("~/bundles/jqueryval")
}
Now run the application and type the following URL . http://localhost:61767/Items/Create
You will see the following output. Now select category from category dropdown lsit, you will see product dropdown list is populating on corresponding category.
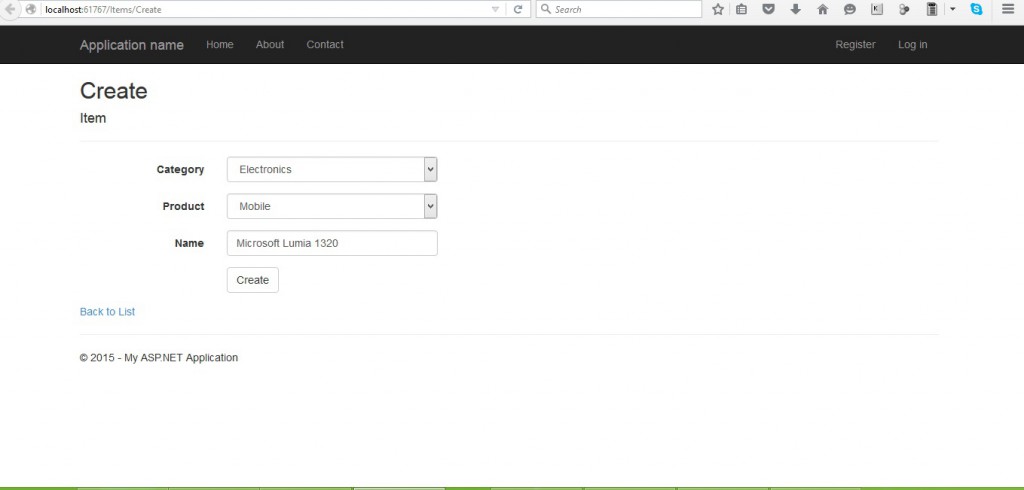
Means, it’s working…!! Cheers!!!

Comments