
Configure Web gardens in IIS 7 step by step
Introduction
“Web garden” scaling out by increasing the number of worker processes per CPU. Web gardening will allow more than two subscribers to synchronize at the same time. Before going to the details of web garden, I hope you have fundamental idea on application pool and worker process. Just for reminder - for request processing in IIS, worker process (w3wp.exe) runs the ASP.NET application in IIS. Worker process is responsible for handling all kinds of request, response, session data, and cache data. Application Pool is the container of worker process. Application pool is used to separate sets of IIS worker processes and enables a better security, reliability, and availability for any web application. It will also increase CPU utilization by replisapi.dll, which can negatively impact overall server performance. So, it is important to balance these considerations when you choose a value for Maximum Worker Processes.
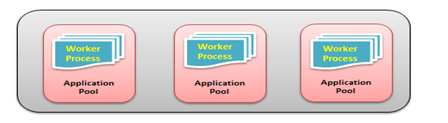
Fig – Application pool is the container of one or more worker processes
Now, by default, each and every Application pool contains a single worker process. Application which contains the multiple worker process is called “Web Garden”. Below is the typical diagram for a web garden application.
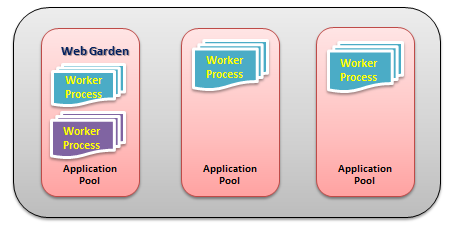
Fig – Multiple worker process in an application pool (Web garden)
Why Web garden?
- Offering applications that are not CPU-bound but execute long running requests the ability to scale and not use up all threads available in the worker process
- Applications that make long running database requests (e.g. high computational database transaction)
- Applications that have threads occupied by long-running synchronous and network intensive transactions
- You can support a greater number of concurrent synchronization operations per CPU by increasing the Maximum Worker Process property value
- Provides better application availability by sharing request between multiple worker processes.
- Web garden use processor affinity where application can swapped out based on preference and tag setting.
- Less consumption of physical space for web garden configuration.
Configure Web garden in IIS 7
Step 1: Deploy and configure your web application as usual
Step 2: Modify web.config file
Find out the following line in web.config file.
<sessionState mode="InProc" timeout="60"></sessionState>
If the above line exists, remove the above line and replace following line.
<sessionState mode="StateServer" cookieless="false" timeout="30" stateConnectionString="tcpip=127.0.0.1:42424" />
Here tcpip = “127.0.0.1” is local state server IP and “42424” is the port number for state server. You can use other IP as state server.
Step 3: Modify registry by regedit
Run -> regedt -> HKEY_LOCAL_MACHINESYSTEM -> CurrentControlSet -> Services -> aspnet_state -> Parameters
- Step a: AllowRemoteConnection (Right Click) -> Modify -> Set Value Data to 1 (Base Decimal) -> Ok
- Step b: Port (Right Click) -> Modify -> Base Decimal -> Ok
Step 4: Run asp.net state service
Check the following step: Run -> control -> Administrative Tools -> Services -> ASP.NET State Service (Right Click) -> Properties
- Step a: Startup Type -> Automatic
- Step b: Service Status -> start
- Finally Click Ok.
Step 5: Create an application pool
Create a different application pool for safety. If you use a separate application pool, it will be easy to manage. You can use default application pool also.
To create an application pool that runs using a custom service account
- Start Internet Information Services (IIS) Manager. (Run->inetmgr)
- In the left pane, expand the local computer and then select Application Pools.
- Right-click the Application Pools node, clicks Add Application Pool, and then clicks Application Pool.
-
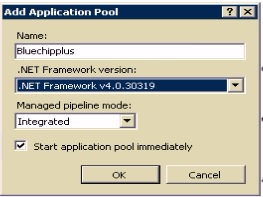
In the Add Application Pool dialog box, type “Pool Name” in the name text box. In figure Pool name is Bluechipplus. Select .NET Framework version. In figure, I select 4.0.30319. Select Managed pipeline mode. I select integrated mode. Selection of framework version and managed pipeline mode depends on your application which you are going to hosted. Click OK to complete application pool creation.
- Now select application pools. You will see newly created Bluechipplus application pool in the middle panel.
Step 6: Configure application pool
- Select newly created “Bluechipplus” application pool in the middle panel.
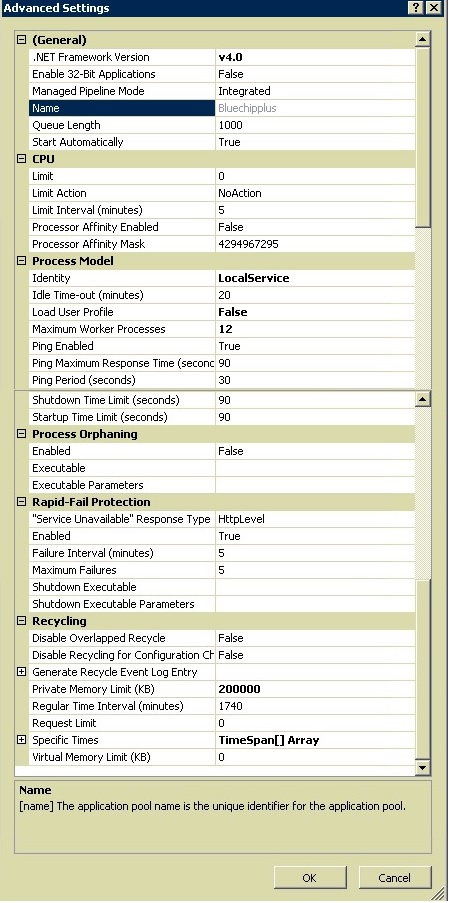
- Click Advanced Settings in “Edit Application Pool” section in the right panel. A dialogue box will appear named “Advanced Settings”
- In Process Model section, select identity. Network service is default and recommended. If you find problem, you should change. In figure Local service is selected.
- In Process Model section, type maximum worker process. In figure 12 maximum worker processes selected. Selecting worker process is actually depends on your server capability and memory.
- In Recycling section, select private memory limit in KB. In figure 200000 is selected. Consider your server memory before considering memory limit.
-
Finally click OK to complete application pool settings.
Step 7: Select application pool for the application
- Right click on application in IIS->Manage Application -> Advanced Settings

- From advanced settings dialogue box -> Browse application pool -> Select application pool

- Finally click OK after assigning application pool
Now you have completed web garden for your application. Browse your application and cheers!!!