
Create a sentiment analysis app using ML.NET
Application overview
ML.NET is a free, open source and cross platform machine learning framework. It is easily integrated with .NET development environment. ML.NET allows you to train, build, and ship custom machine learning models using C# and some other languages. Here a simple sentiment analysis application will be created using ML.NET and C#. Let’s start.
Tools and Technology used The following tools and technologies has been used for this application
- Visual Studio 2019
- Visual C#
Step 1: Create a console application
- Create a new project using visual studio 2019
- Choose the C# Console App (.NET Core) project template
- Change the project and solution name as “SentimentAnalysis”
- Click create button to create the project.
Step 2: Enable the ML.NET Model Builder preview feature Press right button on the project file -> Add -> Machine learning You will see the following pop up message. Enable it.
Would you like to enable the ML.NET Model Builder preview feature so you can add Machine Learning to your .NET projects? Enable
Step 3: Select model builder scenario
- Press right button on the project -> Add -> Machine Learning
- Select Text classification
- Keep the Local Environment and click on data (to move data step)
Step 4: Download and add data
- Download the Sentiment Labelled Sentences datasets from the UCI Machine Learning Repository
- Unzip the file and keep the “yelp_labelled.txt” file to Data folder
- The first column of this file represents the comments and the second column represent the sentiment of the text (0 for negative and 1 for positive)
Add data
- In this form, select File as the input data source type
- Browse file yelp_labelled.txt. Once you are selected, you will see the preview of the data.
- Select “col1” for Column to predict (Label) as the image below
- Now click Train button to move to the train step

Step 5: Train your model
- Time to train set automatically based on data. But you can manually set it.
- Click start training button. You will see the following point the screen.
Best accuracy - Percentage of accuracy of the current model
Best model - This shows you which algorithm performed the best during Model Builder’s exploration.
Training time - Total times taken to run training
Models explored (total) - This shows you the total number of models explored by Model Builder in the given amount of time.
Source : Microsoft docs
- Now click Evaluate to move to the evaluate step
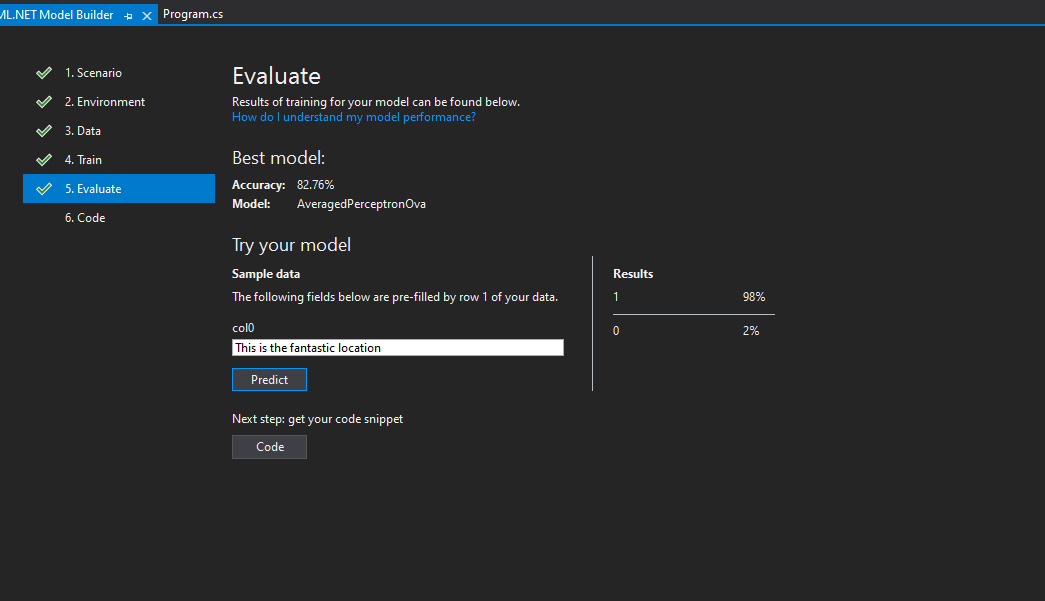
Step 6: Evaluate your model
- Type a sentence in Try your model section.
- I Typed “This is a fantastic place” and it shows positive is 98% and negative 2%
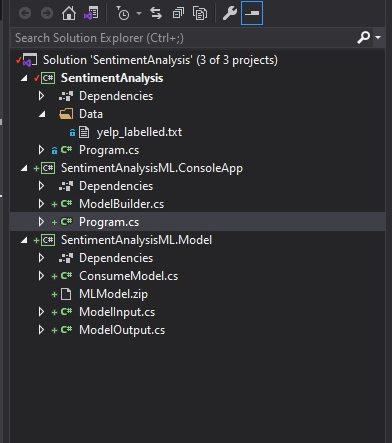
Step 7: Add project in to the solution
- Click Add Project Button
- Model builder will add machine learning model and the project for training
- ModelBuilder.cs in the console application is used to build/train the model
- Program.cs in the console application is used to test run the model
- ModelInput.cs and ModelOutput.cs in Model library is the input and output class for the model training.
- ConsumeModel.cs in Model library contains the method for model consumption
- Solution structure will be like as follows
Step 8: Consume your model
- Set SentimentAnalysisML.ConsoleApp as startup project
- Modify a bit of Program.cs in SentimentAnalysisML.ConsoleApp as follows
    class Program
    {
        static void Main(string[] args)
        {
            // Create single instance of sample data from first line of dataset for model input
            ModelInput sampleData = new ModelInput()
            {
                Col0 = @"The food of Hotel Sonargaon was awesome",
            };

            // Make a single prediction on the sample data and print results
            var predictionResult = ConsumeModel.Predict(sampleData);

            Console.WriteLine("Using model to make single prediction -- Comparing actual Col1 with predicted Col1 from sample data...\n\n");
            Console.WriteLine($"Col0: {sampleData.Col0}");
            Console.WriteLine($"\n\nPredicted Col1 value {predictionResult.Prediction} \nPredicted Col1 scores: [{String.Join(",", predictionResult.Score)}]\n");

            string sentiment = predictionResult.Prediction == "1" ? "Positive" : "Negative";
            Console.WriteLine($"Sentiment: {sentiment} \n");

            Console.WriteLine("=============== End of process, hit any key to finish ===============");
            Console.ReadKey();
        }
    }
Step 9: Build and run the application Now build and run the application. You will see the sentiment output of the sentence “The food of Hotel Sonargaon was awesome”.

Comments