
Unleashing Micro Frontends with React and ASP.NET Core: A Step-by-Step Implementation Approach
Introduction
Micro frontends are an architectural pattern and approach for building modern web applications. Similar to microservices on the backend, micro frontends focus on breaking down the user interface (UI) into smaller, self-contained, and independently deployable parts.
In traditional monolithic frontend architectures, the entire UI is developed as a single codebase, making it difficult to scale, maintain, and iterate on different parts of the application independently. Micro frontends aim to address these challenges by allowing teams to develop and deploy UI components or features as separate entities.
Each micro frontend typically represents a distinct business capability or user journey and can be developed using different technologies or frameworks. This enables teams to choose the most suitable technology stack for their specific needs. For example, one micro frontend may be built using React, while another may use Angular or Vue.js.
Micro frontends communicate with each other and the backend through well-defined APIs or events, enabling them to work together seamlessly as a cohesive application. This approach promotes modularization, scalability, and reusability, as teams can develop, test, and deploy their micro frontends independently.
By adopting micro frontends, organizations can effectively distribute development efforts among multiple teams, enabling faster delivery, easier maintenance, and better isolation of components. This approach also facilitates technology diversity, allowing teams to leverage different tools and frameworks within the same application.
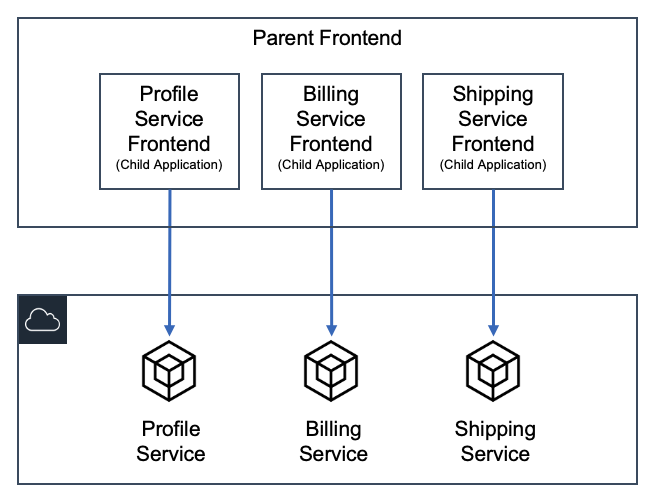
Fig: Micro frontend Architecture. (Source: Internet)
Objective
In this article I will show you how to build Micro front end application using react and asp.net core. Here I am going to create four react applications. One is Master or Container service and other three will be child project or service. Master service will be master-frontend application and other three service will be header-frontend, product-frontend and customer-frontend. I will create two api project using asp.net core for product-frontend and customer-frontend. At the end you will see a complete micro frontend application up and running.
Step 1: Create four react projects.
- Open a terminal or bash, write below commands to create four React projects.
npx create-react-app master-frontend
npx create-react-app header-frontend
npx create-react-app product-frontend
npx create-react-app customer-frontend
Step 2: Configure “header-frontend” react project
- Now we are going to configure header-frontend project to use inside our Master Project as a service.
- Go to header-frontend project
- Open the terminal and install below libraries with below command.
npm install react-router-dom npm install react-bootstrap bootstrap@5.1.3 npm install react-app-rewired history - Inside the src directory, create a folder and name the folder components.
- Inside components folder create a file and name the file Header.js
- Write below code in src->components->Header.js
import React from "react";
import { Container } from "react-bootstrap";

const Header = () => {
  return (
    <Container fluid className="App-header">
      <p>Micro Frontend using React.js</p>
    </Container>
  );
};

export default Header;
- Open App.js file and replace with below code.
import logo from "./logo.svg";
import "./App.css";
import { BrowserRouter } from "react-router-dom";
import Header from "./components/Header";

function App() {
  return (
    <BrowserRouter>
      <Header />
    </BrowserRouter>
  );
}

export default App;
- Open App.css file and replace the file with below code.
.App-header {
  background-color: #4d739e;
  min-height: 3vh;
  display: flex;
  flex-direction: column;
  align-items: center;
  justify-content: center;
  font-size: calc(10px + 2vmin);
  color: white;

  box-shadow: rgba(0, 0, 0, 0.25) 0px 5px 15px;
}
- Create another file inside src folder, name the file setupProxy.js and write below code for cors policy.
module.exports = (app) => {
  app.use((req, res, next) => {
    res.header("Access-Control-Allow-Origin", "*");
    next();
  });
};
- Open index.js file and replace with below code.
import React from "react";
import ReactDOM from "react-dom/client";
import "./index.css";
import "bootstrap/dist/css/bootstrap.min.css";
import App from "./App";
import reportWebVitals from "./reportWebVitals";

window.renderHeader = (masterId, history) => {
  const root = ReactDOM.createRoot(document.getElementById(masterId));

  root.render(
    <React.StrictMode>
      <App history={history} />
    </React.StrictMode>
  );
};

window.unmountHeader = (masterId) => {
  ReactDOM.unmountComponentAtNode(document.getElementById(masterId));
};

if (!document.getElementById("Header-master")) {
  const root = ReactDOM.createRoot(document.getElementById("root"));
  root.render(
    <React.StrictMode>
      <App />
    </React.StrictMode>
  );
}

// If you want to start measuring performance in your app, pass a function
// to log results (for example: reportWebVitals(console.log))
// or send to an analytics endpoint. Learn more: https://bit.ly/CRA-vitals
reportWebVitals();
- Create a file inside root directory and name the file config-overrides.js and write below code. Below code will override webpack of react.
module.exports = {
  webpack: (config, env) => {
    config.optimization.runtimeChunk = false;
    config.optimization.splitChunks = {
      cacheGroups: {
        default: false,
      },
    };

    config.output.filename = "static/js/[name].js";

    config.plugins[5].options.filename = "static/css/[name].css";
    config.plugins[5].options.moduleFilename = () => "static/css/main.css";
    return config;
  },
};
- Open package.json and replace “scripts” section with below code. This project going to be open on 3001 port because we set PORT = 3001 in script section.
"scripts": {
"start": "set PORT=3001 && react-app-rewired start",
"build": "react-app-rewired build",
"test": "react-app-rewired test",
"eject": "react-scripts eject"
},
- Now open the terminal and start the project with below command.
npm start
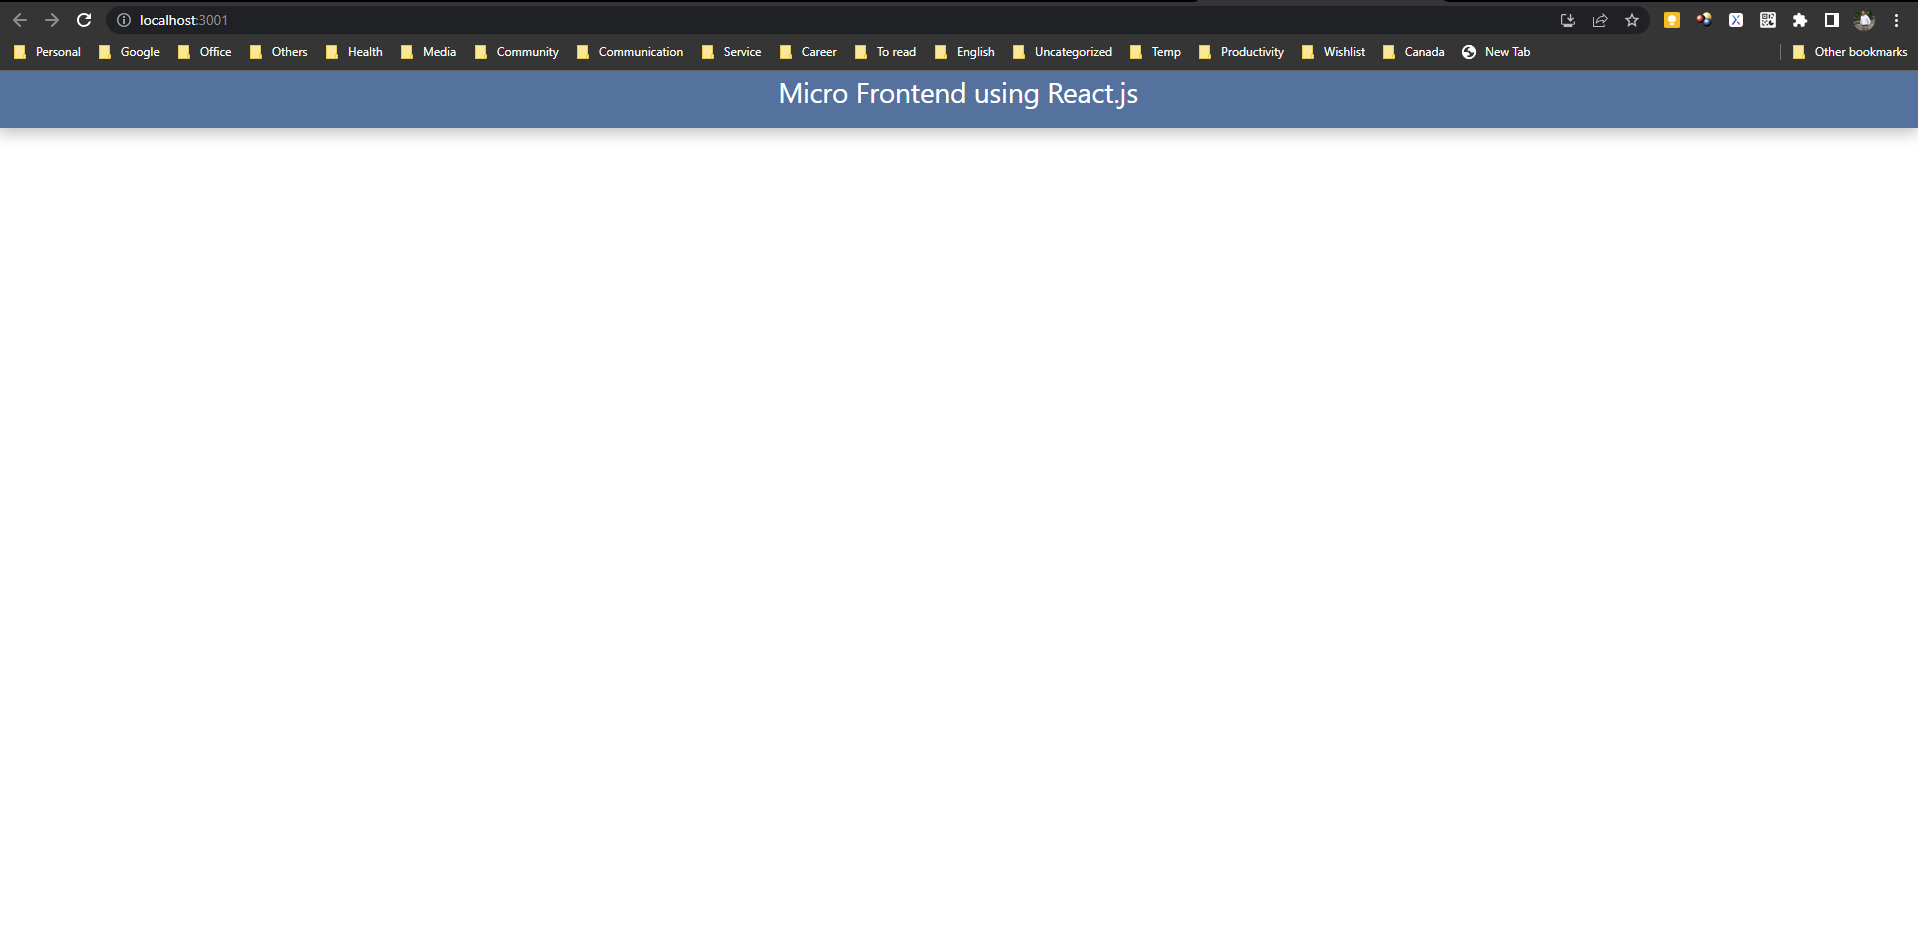
- Browser output should look like below. If you see below output, means our header frontend project is ready.
Step 3: Create Product.API Backend Project
- Create a web api project name Product.API
- Install following Nuget packages in the project
Microsoft.EntityFrameworkCore
Microsoft.EntityFrameworkCore.InMemory
Microsoft.EntityFrameworkCore.SqlServer
Microsoft.EntityFrameworkCore.Tools
Microsoft.VisualStudio.Web.CodeGeneration.Design
- Create following two model class in Model folder
Product.cs
namespace Product.API.Model
{
    public class Product
    {
        public int Id { get; set; }
        public string? Name { get; set; }
        public string? ShortName { get; set;}
        public double Price { get; set; }
        public DateTime? ManufactureDate { get; set; }
        public DateTime? ExpiryDate { get; set; }
    }
}
Category.cs
namespace Product.API.Model
{
    public class Category
    {
        public int Id { get; set; }
        public string? Name { get; set; }
        public string? DisplayName { get; set;}
    }
}
- Add following DbContext and SeedGenerator class in Db folder
ProductContext.cs
using Microsoft.EntityFrameworkCore;
using Product.API.Model;

namespace Product.API.Db
{
public class ProductContext : DbContext
{
public ProductContext(DbContextOptions<ProductContext> options)
: base(options)
{

        }
        public DbSet<Product.API.Model.Product> Products { get; set; }
        public DbSet<Category> Categories { get; set; }
    }

}
SeedGenerator.cs
using Product.API.Model;

namespace Product.API.Db
{
    public class SeedGenerator
    {
        public static void SeedData(WebApplication app)
        {
            using (var scope = app.Services.CreateScope())
            {
                var context = scope.ServiceProvider.GetService<ProductContext>();
                if (!context.Products.Any())
                {
                    context.Products.AddRange(
                        new Product.API.Model.Product
                        {
                            Name = "Cat's Shirt ",
                            ShortName = "Shirt",
                            Price = 1200,
                            ManufactureDate = DateTime.Today,
                            ExpiryDate = DateTime.Now.AddYears(5)
                        },
                         new Product.API.Model.Product
                         {
                             Name = "Lipton Tea Bag",
                             ShortName = "Tea",
                             Price = 150,
                             ManufactureDate = DateTime.Today,
                             ExpiryDate = DateTime.Now.AddYears(2)
                         }
                         );
                    context.SaveChanges();
                }

                if (!context.Categories.Any())
                {
                    context.Categories.AddRange(
                        new Category
                        {
                            Name = "Beverages",
                            DisplayName = "Beverages"
                        },
                        new Category
                        {
                            Name = "Grossery",
                            DisplayName = "Grossery"
                        });
                    context.SaveChanges();
                }


            }
        }
    }
}
- Modify Program.cs file to configure in memory database and seed data as follows.
Program.cs
//using Microsoft.AspNetCore.Http.Connections;
using Microsoft.EntityFrameworkCore;
using Product.API.Db;

var builder = WebApplication.CreateBuilder(args);

// Add services to the container.
builder.Services.AddDbContext<ProductContext>(opt => opt.UseInMemoryDatabase("ProductDB"));

builder.Services.AddControllers();

// Learn more about configuring Swagger/OpenAPI at https://aka.ms/aspnetcore/swashbuckle
builder.Services.AddEndpointsApiExplorer();
builder.Services.AddSwaggerGen();

var app = builder.Build();

//For seeding data
SeedGenerator.SeedData(app);

// Configure the HTTP request pipeline.
if (app.Environment.IsDevelopment())
{
app.UseSwagger();
app.UseSwaggerUI();

    // Enable CORS
    app.UseCors(x => x
    .AllowAnyMethod()
    .AllowAnyHeader()
    .SetIsOriginAllowed(origin => true) // allow any origin
    .AllowCredentials()); // allow credentials

}

app.UseHttpsRedirection();

app.UseAuthorization();

app.UseRouting();
app.MapControllers();

app.Run();
- Create two controller class name ProductsController and CategoriesController in Controllers folder
ProductsController.cs
using Microsoft.AspNetCore.Mvc;
using Microsoft.EntityFrameworkCore;
using Product.API.Db;

namespace Product.API.Controllers
{
[Route("api/[controller]")]
[ApiController]
public class ProductsController : ControllerBase
{
private readonly ProductContext \_context;

        public ProductsController(ProductContext context)
        {
            _context = context;
        }

        // GET: api/Products
        [HttpGet]
        public async Task<ActionResult<IEnumerable<Product.API.Model.Product>>> GetProducts()
        {
            return await _context.Products.ToListAsync();
        }

        // GET: api/Products/5
        [HttpGet("{id}")]
        public async Task<ActionResult<Product.API.Model.Product>> GetProduct(int id)
        {
            var product = await _context.Products.FindAsync(id);

            if (product == null)
            {
                return NotFound();
            }

            return product;
        }

        // PUT: api/Products/5
        // To protect from overposting attacks, see https://go.microsoft.com/fwlink/?linkid=2123754
        [HttpPut("{id}")]
        public async Task<IActionResult> PutProduct(int id, Product.API.Model.Product product)
        {
            if (id != product.Id)
            {
                return BadRequest();
            }

            _context.Entry(product).State = EntityState.Modified;

            try
            {
                await _context.SaveChangesAsync();
            }
            catch (DbUpdateConcurrencyException)
            {
                if (!ProductExists(id))
                {
                    return NotFound();
                }
                else
                {
                    throw;
                }
            }

            return NoContent();
        }

        // POST: api/Products
        // To protect from overposting attacks, see https://go.microsoft.com/fwlink/?linkid=2123754
        [HttpPost]
        public async Task<ActionResult<Product.API.Model.Product>> PostProduct(Product.API.Model.Product product)
        {
            _context.Products.Add(product);
            await _context.SaveChangesAsync();

            return CreatedAtAction("GetProduct", new { id = product.Id }, product);
        }

        // DELETE: api/Products/5
        [HttpDelete("{id}")]
        public async Task<IActionResult> DeleteProduct(int id)
        {
            var product = await _context.Products.FindAsync(id);
            if (product == null)
            {
                return NotFound();
            }

            _context.Products.Remove(product);
            await _context.SaveChangesAsync();

            return NoContent();
        }

        private bool ProductExists(int id)
        {
            return _context.Products.Any(e => e.Id == id);
        }
    }

}
CategoriesController.cs
using Microsoft.AspNetCore.Mvc;
using Microsoft.EntityFrameworkCore;
using Product.API.Db;
using Product.API.Model;

namespace Product.API.Controllers
{
[Route("api/[controller]")]
[ApiController]
public class CategoriesController : ControllerBase
{
private readonly ProductContext \_context;

        public CategoriesController(ProductContext context)
        {
            _context = context;
        }

        // GET: api/Categories
        [HttpGet]
        public async Task<ActionResult<IEnumerable<Category>>> GetCategories()
        {
          if (_context.Categories == null)
          {
              return NotFound();
          }
            return await _context.Categories.ToListAsync();
        }

        // GET: api/Categories/5
        [HttpGet("{id}")]
        public async Task<ActionResult<Category>> GetCategory(int id)
        {
          if (_context.Categories == null)
          {
              return NotFound();
          }
            var category = await _context.Categories.FindAsync(id);

            if (category == null)
            {
                return NotFound();
            }

            return category;
        }

        // PUT: api/Categories/5
        // To protect from overposting attacks, see https://go.microsoft.com/fwlink/?linkid=2123754
        [HttpPut("{id}")]
        public async Task<IActionResult> PutCategory(int id, Category category)
        {
            if (id != category.Id)
            {
                return BadRequest();
            }

            _context.Entry(category).State = EntityState.Modified;

            try
            {
                await _context.SaveChangesAsync();
            }
            catch (DbUpdateConcurrencyException)
            {
                if (!CategoryExists(id))
                {
                    return NotFound();
                }
                else
                {
                    throw;
                }
            }

            return NoContent();
        }

        // POST: api/Categories
        // To protect from overposting attacks, see https://go.microsoft.com/fwlink/?linkid=2123754
        [HttpPost]
        public async Task<ActionResult<Category>> PostCategory(Category category)
        {
          if (_context.Categories == null)
          {
              return Problem("Entity set 'AdminContext.Categories'  is null.");
          }
            _context.Categories.Add(category);
            await _context.SaveChangesAsync();

            return CreatedAtAction("GetCategory", new { id = category.Id }, category);
        }

        // DELETE: api/Categories/5
        [HttpDelete("{id}")]
        public async Task<IActionResult> DeleteCategory(int id)
        {
            if (_context.Categories == null)
            {
                return NotFound();
            }
            var category = await _context.Categories.FindAsync(id);
            if (category == null)
            {
                return NotFound();
            }

            _context.Categories.Remove(category);
            await _context.SaveChangesAsync();

            return NoContent();
        }

        private bool CategoryExists(int id)
        {
            return (_context.Categories?.Any(e => e.Id == id)).GetValueOrDefault();
        }
    }

}
- Now run the application and access the endpoints using swagger.
Step 4: Configure product-frontend React Project
Now we are going to configure product-frontend project to use inside our Master Project as a service.
- Open the Terminal and install below libraries with below command.
npm install react-router-dom
npm install react-bootstrap bootstrap@5.1.3
npm install react-app-rewired
npm install axios history
npm install react-data-table-component
npm install @mui/material @emotion/react @emotion/styled
npm install @mui/material @mui/styled-engine-sc styled-components
npm install @mui/icons-material
- Inside the src directory, create a folder and name the folder utils.
- Inside utils folder create a file and name the file BaseUrl.js
- Write below code because our product api is running on 7155 port
BaseUrl.js
export const Base_URL_Product = "https://localhost:7155/api";
- Create another js file inside the utils directory and name the file Conversions.js, write below code.
Conversions.js
export const convertDateFormat = (date) => {
  let convertedDate = new Date(date);
  return convertedDate.toDateString();
};
- Inside the src directory, create a folder and name the folder services.
- Inside services folder create a file and name the file ProductService.js
- Write below code in src->services-> ProductService.js
ProductService.js
import axios from "axios";
import { Base_URL_Product } from "../utils/BaseUrl";

export const GetAllProducts = () => {
  try {
    const response = axios.get(Base_URL_Product + `/Products`);
    console.log("response", response);
    return response;
  } catch (er) {
    throw er;
  }
};

export const GetAllCategory = () => {
  try {
    const response = axios.get(Base_URL_Product + `/Categories`);
    return response;
  } catch (er) {
    throw er;
  }
};
- Inside the src directory, create a folder and name the folder components.
- Inside components folder create another folder and name the folder ProductComponent.
- Inside ProductComponent folder create a file and name the file DataTableComponent.js
- Write below code in src -> components -> ProductComponent -> DataTableComponent.js
DataTableComponent.js
import React from "react";
import { Card } from "@mui/material";
import SortIcon from "@mui/icons-material/ArrowDownward";
import DataTable from "react-data-table-component";
import { convertDateFormat } from "../../utils/Conversions";

const DataTableComponent = ({ data }) => {
  console.log(data);
  const columns = [
    {
      id: 1,
      name: "Name",
      selector: (row) => row.name,
      sortable: true,
      reorder: true,
    },
    {
      id: 2,
      name: "Short Name",
      selector: (row) => row.shortName,
      sortable: true,
      right: true,
      reorder: true,
    },
    {
      id: 3,
      name: "Price",
      selector: (row) => row.price,
      sortable: true,
      right: true,
      reorder: true,
    },

    {
      id: 4,
      name: "Manufacture Date",
      selector: (row) => convertDateFormat(row.manufactureDate),
      sortable: true,
      right: true,
      reorder: true,
    },
    {
      id: 5,
      name: "Expiry Date",
      selector: (row) => convertDateFormat(row.expiryDate),
      sortable: true,
      right: true,
      reorder: true,
    },
  ];
  return (
    <div className="data-table">
      <Card>
        <DataTable
          title="Product List"
          columns={columns}
          data={data}
          defaultSortFieldId={4}
          sortIcon={<SortIcon />}
          pagination
          selectableRows
          paginationPerPage={5}
          paginationRowsPerPageOptions={[5, 10, 15, 20]}
        />
      </Card>
    </div>
  );
};

export default DataTableComponent;
- Now Inside ProductComponent folder create another file and name the file ProductListComponent.js
- Write below code in src->components->ProductComponent-> ProductListComponent.js
ProductListComponent.js
import React, { useEffect, useState } from "react";
import { GetAllProducts } from "../../services/ProductService";
import DataTableComponent from "./DataTableComponent";

const ProductListComponent = () => {
  const [state, setState] = useState([]);

  useEffect(() => {
    GetAllProducts().then((res) => {
      console.log(res.data);
      setState(res.data);
    });
  }, []);

  return (
    <div style=>
      <DataTableComponent data={state} />
    </div>
  );
};

export default ProductListComponent;
- Inside components folder create another folder and name the folder CategoryComponent.
- Inside CategoryComponent folder create a file and name the file DataTableComponent.js
- Write below code in src->components-> CategoryComponent-> DataTableComponent.js DataTableComponent.js
import React from "react";
import { Card } from "@mui/material";
import SortIcon from "@mui/icons-material/ArrowDownward";
import DataTable from "react-data-table-component";

const DataTableComponent = ({ data }) => {
  const columns = [
    {
      id: 1,
      name: "Name",
      selector: (row) => row.name,
      sortable: true,
      reorder: true,
    },
    {
      id: 2,
      name: "Display Name",
      selector: (row) => row.displayName,
      sortable: true,
      right: true,
      reorder: true,
    },
  ];
  return (
    <div className="data-table">
      <Card>
        <DataTable
          title="Product Category List"
          columns={columns}
          data={data}
          defaultSortFieldId={4}
          sortIcon={<SortIcon />}
          pagination
          selectableRows
        />
      </Card>
    </div>
  );
};

export default DataTableComponent;
- Inside CategoryComponentfolder create a file and name the file CategoryListComponent.js
- Write below code in src->components-> CategoryComponent->CategoryListComponent.js CategoryListComponent.js
import React, { useEffect, useState } from "react";
import { GetAllCategory } from "../../services/ProductService";
import DataTableComponent from "./DataTableComponent";

const CategoryListComponent = () => {
  const [state, setState] = useState([]);

  useEffect(() => {
    GetAllCategory().then((res) => {
      console.log("category", res.data);
      setState(res.data);
    });
  }, []);

  return (
    <div style=>
      <DataTableComponent data={state} />
    </div>
  );
};

export default CategoryListComponent;
- Inside the src directory, create a folder and name the folder pages.
- Inside pages folder create a js file and name the file ProductsPage.js and write below code.
import React from "react";
import ProductListComponent from "../components/ProductComponent/ProductListComponent";

const ProductsPage = () => {
  return (
    <>
      <ProductListComponent />
    </>
  );
};

export default ProductsPage;
- Inside pages folder create a js file and name the file CategoriesPage.js and write below code.
import React from "react";
import GroupTypesListComponent from "../components/CategoryComponent/CategoryListComponent";

const CategoriesPage = () => {
  return (
    <>
      <GroupTypesListComponent />
    </>
  );
};

export default CategoriesPage;
- Open App.css file and replace with below code.
.data-table {
  box-shadow: rgba(0, 0, 0, 0.25) 5px 5px 15px 0px;
}
- Open App.js file and replace with below code.
import logo from "./logo.svg";
import "./App.css";
import { BrowserRouter, Routes, Route } from "react-router-dom";
import ProductsPage from "./pages/ProductsPage";
import CategoriesPage from "./pages/CategoriesPage";
import { createBrowserHistory } from "history";

const defaultHistory = createBrowserHistory();

function App({ history = defaultHistory }) {
  return (
    <BrowserRouter>
      <Routes>
        <Route path="/" element={<ProductsPage />} />
        <Route path="/product-list" element={<ProductsPage />} />
        <Route path="/product-categories" element={<CategoriesPage />} />
      </Routes>
    </BrowserRouter>
  );
}

export default App;
- Open index.js file and replace with below code.
import React from "react";
import ReactDOM from "react-dom/client";
//import ReactDOM from "react-dom";
import "./index.css";
import App from "./App";
import reportWebVitals from "./reportWebVitals";

window.renderProduct = (masterId, history) => {
  const root = ReactDOM.createRoot(document.getElementById(masterId));

  root.render(
    <React.StrictMode>
      <App history={history} />
    </React.StrictMode>
  );
};

window.unmountProduct = (masterId) => {
  const root = document.getElementById(masterId);
  //root.unmount();
  //root.remove();
};

if (!document.getElementById("Product-master")) {
  const root = ReactDOM.createRoot(document.getElementById("root"));
  root.render(
    <React.StrictMode>
      <App />
    </React.StrictMode>
  );
}

// If you want to start measuring performance in your app, pass a function
// to log results (for example: reportWebVitals(console.log))
// or send to an analytics endpoint. Learn more: https://bit.ly/CRA-vitals
reportWebVitals();
- Create another file inside src folder, name the file setupProxy.js and write below code for cors policy.
module.exports = (app) => {
  app.use((req, res, next) => {
    res.header("Access-Control-Allow-Origin", "*");
    next();
  });
};
- Create a file inside root directory and name the file config-overrides.js and write below code. Below code will override webpack of react.
module.exports = {
  webpack: (config, env) => {
    config.optimization.runtimeChunk = false;
    config.optimization.splitChunks = {
      cacheGroups: {
        default: false,
      },
    };

    config.output.filename = "static/js/[name].js";

    config.plugins[5].options.filename = "static/css/[name].css";
    config.plugins[5].options.moduleFilename = () => "static/css/main.css";
    return config;
  },
};
- Open package.json and replace “scripts” section with below code. This project going to be open on 3002 port.
"scripts": {
"start": "set PORT=3002 && react-app-rewired start",
"build": "react-app-rewired build",
"test": "react-app-rewired test",
"eject": "react-scripts eject"
},
- Run Product.API back end application
- Go to the directory of product-fronend and run the below command
npm start
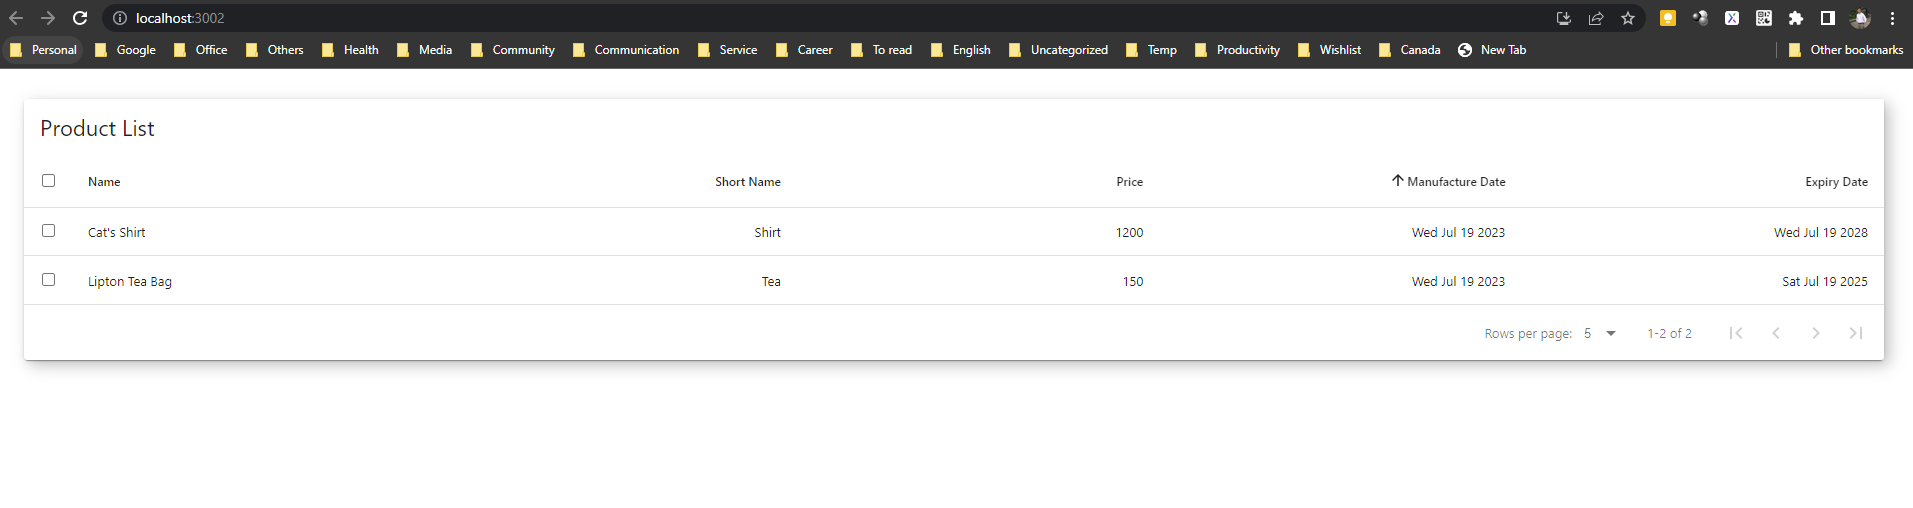
- Browser output should look like below.
• If you try using this url http://localhost:3002/product-categories. You will get the following output.
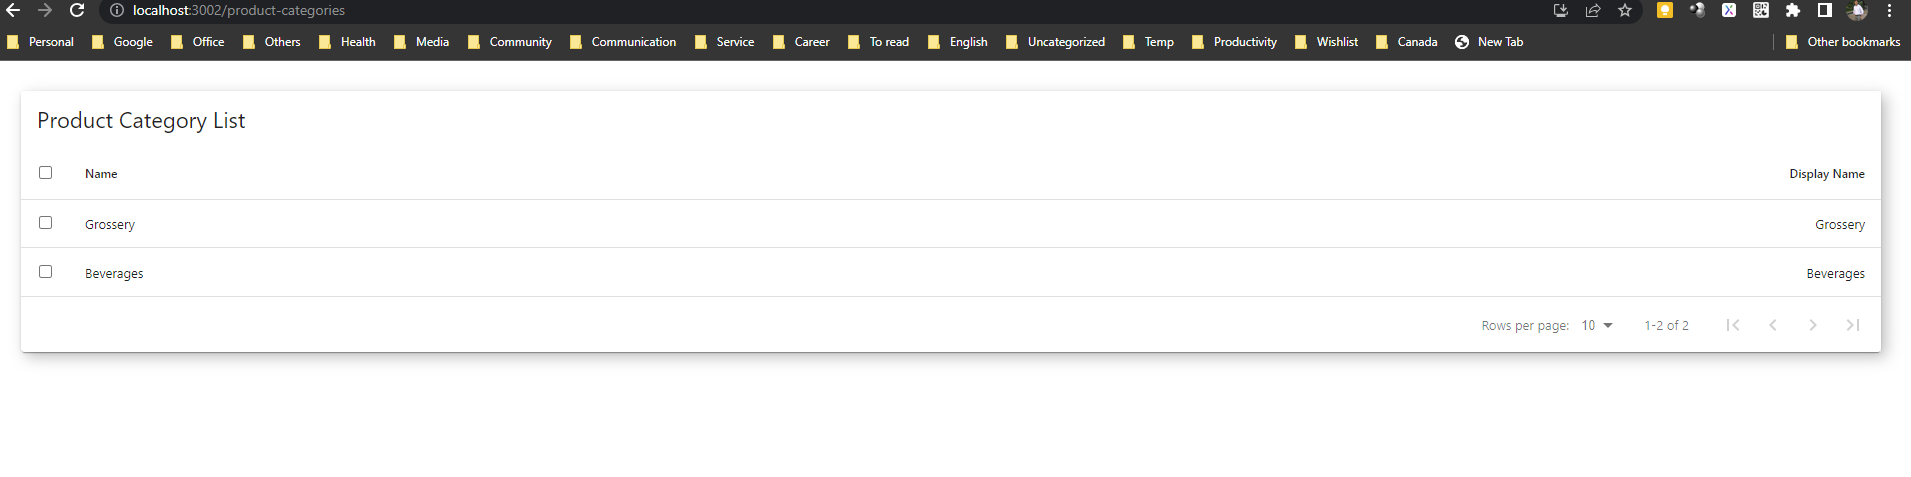
- If You see the above output, it means it works fine.
Step 5: Create Customers.API Backend Project
- Create a web api project name Customers.API
- Install following Nuget packages in the project
  Microsoft.EntityFrameworkCore
  Microsoft.EntityFrameworkCore.InMemory
  Microsoft.EntityFrameworkCore.SqlServer
  Microsoft.EntityFrameworkCore.Tools
  Microsoft.VisualStudio.Web.CodeGeneration.Design
- Create following Customer model class in Model folder
Customer.cs
namespace Customers.API.Model
{
    public class Customer
    {
        public int Id { get; set; }
        public string? Name { get; set; }
        public string? PhoneNo { get; set;}
        public string? EmailAddress { get; set;}
        public DateTime? DOB { get; set; }
    }
}
- Add following DbContext and SeedGenerator class in Db folder
CustomersContext.cs
using Customers.API.Model;
using Microsoft.EntityFrameworkCore;

namespace Customers.API.Db
{
public class CustomersContext : DbContext
{
public CustomersContext(DbContextOptions<CustomersContext> options)
: base(options)
{

        }
        public DbSet<Customer> Customers { get; set; }
    }

}
SeedGenerator.cs
using Customers.API.Model;

namespace Customers.API.Db
{
    public class SeedGenerator
    {
        public static void SeedData(WebApplication app)
        {
            using (var scope = app.Services.CreateScope())
            {
                var context = scope.ServiceProvider.GetService<CustomersContext>();


                if (!context.Customers.Any())
                {
                    context.Customers.AddRange(
                        new Customer
                        {
                            Name = "Scott Allen",
                            EmailAddress = "scott@gmail.com",
                            PhoneNo = "5068792493",
                            DOB = DateTime.Now.AddYears(-50),
                        },
                        new Customer
                        {
                            Name = "Graham Bell",
                            EmailAddress = "bell@outlook.com",
                            PhoneNo = "5068792494",
                            DOB = DateTime.Now.AddYears(-54),
                        },
                        new Customer
                        {
                            Name = "Adam Smith",
                            EmailAddress = "smith@yahoo.com",
                            PhoneNo = "5068792494",
                            DOB = DateTime.Now.AddYears(-54),
                        }); ;
                    context.SaveChanges();
                }

            }
        }
    }
}
- Modify Program.cs file to configure in memory database and seed data as follows. Program.cs
//using Microsoft.AspNetCore.Http.Connections;
using Microsoft.EntityFrameworkCore;
using Product.API.Db;

var builder = WebApplication.CreateBuilder(args);

// Add services to the container.
builder.Services.AddDbContext<ProductContext>(opt => opt.UseInMemoryDatabase("ProductDB"));


builder.Services.AddControllers();


// Learn more about configuring Swagger/OpenAPI at https://aka.ms/aspnetcore/swashbuckle
builder.Services.AddEndpointsApiExplorer();
builder.Services.AddSwaggerGen();

var app = builder.Build();

//For seeding data
SeedGenerator.SeedData(app);

// Configure the HTTP request pipeline.
if (app.Environment.IsDevelopment())
{
    app.UseSwagger();
    app.UseSwaggerUI();

    // Enable CORS
    app.UseCors(x => x
    .AllowAnyMethod()
    .AllowAnyHeader()
    .SetIsOriginAllowed(origin => true) // allow any origin
    .AllowCredentials()); // allow credentials
}

app.UseHttpsRedirection();

app.UseAuthorization();

app.UseRouting();
app.MapControllers();

app.Run();
- Create two controller class name CustomersController in Controllers folder
CustomersController.cs
using Customers.API.Db;
using Customers.API.Model;
using Microsoft.AspNetCore.Mvc;
using Microsoft.EntityFrameworkCore;

namespace Customers.API.Controllers
{
[Route("api/[controller]")]
[ApiController]
public class CustomersController : ControllerBase
{
private readonly CustomersContext \_context;

        public CustomersController(CustomersContext context)
        {
            _context = context;
        }

        // GET: api/Customers
        [HttpGet]
        public async Task<ActionResult<IEnumerable<Customer>>> GetCustomers()
        {
          if (_context.Customers == null)
          {
              return NotFound();
          }
            return await _context.Customers.ToListAsync();
        }

        // GET: api/Customers/5
        [HttpGet("{id}")]
        public async Task<ActionResult<Customer>> GetCustomer(int id)
        {
          if (_context.Customers == null)
          {
              return NotFound();
          }
            var customer = await _context.Customers.FindAsync(id);

            if (customer == null)
            {
                return NotFound();
            }

            return customer;
        }

        // PUT: api/Customers/5
        // To protect from overposting attacks, see https://go.microsoft.com/fwlink/?linkid=2123754
        [HttpPut("{id}")]
        public async Task<IActionResult> PutCustomer(int id, Customer customer)
        {
            if (id != customer.Id)
            {
                return BadRequest();
            }

            _context.Entry(customer).State = EntityState.Modified;

            try
            {
                await _context.SaveChangesAsync();
            }
            catch (DbUpdateConcurrencyException)
            {
                if (!CustomerExists(id))
                {
                    return NotFound();
                }
                else
                {
                    throw;
                }
            }

            return NoContent();
        }

        // POST: api/Customers
        // To protect from overposting attacks, see https://go.microsoft.com/fwlink/?linkid=2123754
        [HttpPost]
        public async Task<ActionResult<Customer>> PostCustomer(Customer customer)
        {
          if (_context.Customers == null)
          {
              return Problem("Entity set 'CustomersContext.Customers'  is null.");
          }
            _context.Customers.Add(customer);
            await _context.SaveChangesAsync();

            return CreatedAtAction("GetCustomer", new { id = customer.Id }, customer);
        }

        // DELETE: api/Customers/5
        [HttpDelete("{id}")]
        public async Task<IActionResult> DeleteCustomer(int id)
        {
            if (_context.Customers == null)
            {
                return NotFound();
            }
            var customer = await _context.Customers.FindAsync(id);
            if (customer == null)
            {
                return NotFound();
            }

            _context.Customers.Remove(customer);
            await _context.SaveChangesAsync();

            return NoContent();
        }

        private bool CustomerExists(int id)
        {
            return (_context.Customers?.Any(e => e.Id == id)).GetValueOrDefault();
        }
    }

}

//using Microsoft.AspNetCore.Http.Connections;
using Microsoft.EntityFrameworkCore;
using Product.API.Db;

var builder = WebApplication.CreateBuilder(args);

// Add services to the container.
builder.Services.AddDbContext<ProductContext>(opt => opt.UseInMemoryDatabase("ProductDB"));

builder.Services.AddControllers();

// Learn more about configuring Swagger/OpenAPI at https://aka.ms/aspnetcore/swashbuckle
builder.Services.AddEndpointsApiExplorer();
builder.Services.AddSwaggerGen();

var app = builder.Build();

//For seeding data
SeedGenerator.SeedData(app);

// Configure the HTTP request pipeline.
if (app.Environment.IsDevelopment())
{
app.UseSwagger();
app.UseSwaggerUI();

    // Enable CORS
    app.UseCors(x => x
    .AllowAnyMethod()
    .AllowAnyHeader()
    .SetIsOriginAllowed(origin => true) // allow any origin
    .AllowCredentials()); // allow credentials

}

app.UseHttpsRedirection();

app.UseAuthorization();

app.UseRouting();
app.MapControllers();

app.Run();
- Now run the application and access the endpoints using swagger.
Step 6: Configure customer-frontend React Project
- Now we are going to configure customer-frontend project to use inside our Master Project as a service.
- Open the Terminal and install below libraries with below command in customer-frontend project
npm install react-router-dom
npm install react-bootstrap bootstrap@5.1.3
npm install react-app-rewired
npm install axios history
npm install react-data-table-component
npm install @mui/material @emotion/react @emotion/styled
npm install @mui/material @mui/styled-engine-sc styled-components
npm install @mui/icons-material
- Inside the src directory, create a folder and name the folder utils.
- Inside utils folder create a file and name the file BaseUrl.js
- Write below code in src->utils->BaseUrl.js
BaseUrl.js
export const Base_URL_Customer = "https://localhost:7154/api";
- Create another js file inside the utils directory and name the file Conversions.js
- Write below code in src->utils-> Conversions.js
Conversions.js
export const convertDateFormat = (date) => {
  let convertedDate = new Date(date);
  return convertedDate.toDateString();
};
- Inside the src directory, create a folder and name the folder services.
- Inside services folder create a file and name the file CustomerService.js
- Write below code in src->services-> CustomerService.js
CustomerService.js
import axios from "axios";
import { Base_URL_Customer } from "../utils/BaseUrl";

export const GetAllCustomers = (offset, pageSize, access_token) => {
  try {
    const response = axios.get(Base_URL_Customer + "/Customers");
    return response;
  } catch (error) {
    throw error;
  }
};
- Inside the src directory, create a folder and name the folder components.
- Inside components folder create another folder and name the folder CustomerComponent.
- Inside CustomerComponentfolder create a file and name the file DataTableComponent.js
- Write below code in src->components-> CustomerComponent-> DataTableComponent.js
DataTableComponent.js
import React from "react";
import { Card } from "@mui/material";
import SortIcon from "@mui/icons-material/ArrowDownward";
import DataTable from "react-data-table-component";
import { convertDateFormat } from "../../utils/Conversions";

const DataTableComponent = ({ data }) => {
  const columns = [
    {
      id: 1,
      name: "Name",
      selector: (row) => row.name,
      sortable: true,
      reorder: true,
    },
    {
      id: 2,
      name: "Phone No",
      selector: (row) => row.phoneNo,
      sortable: true,
      right: true,
      reorder: true,
    },
    {
      id: 3,
      name: "Email Address",
      selector: (row) => row.emailAddress,
      sortable: true,
      right: true,
      reorder: true,
    },
    {
      id: 4,
      name: "Date of Birth",
      selector: (row) => convertDateFormat(row.dob),
      sortable: true,
      right: true,
      reorder: true,
    },
  ];
  return (
    <div className="data-table">
      <Card>
        <DataTable
          title="Customers List"
          columns={columns}
          data={data}
          defaultSortFieldId={4}
          sortIcon={<SortIcon />}
          pagination
          selectableRows
          paginationPerPage={5}
          paginationRowsPerPageOptions={[5, 10, 15, 20]}
        />
      </Card>
    </div>
  );
};

export default DataTableComponent;
- Inside CustomerComponent folder create a file and name the file CustomersListComponent.js
- Write below code in src->components-> CustomerComponent ->CustomersListComponent.js
CustomersListComponent.js
import React, { useEffect, useState } from "react";
import { GetAllCustomers } from "../../services/CustomerService";
import DataTableComponent from "./DataTableComponent";

const CustomersListComponent = () => {
  const [state, setState] = useState([]);

  useEffect(() => {
    GetAllCustomers().then((res) => {
      setState(res.data);
    });
  }, []);

  return (
    <div style=>
      <DataTableComponent data={state} />
    </div>
  );
};

export default CustomersListComponent;
- Inside the src directory, create a folder and name the folder pages.
- Inside pages folder create a js file and name the file CustomerPage.js
- Write below code in src->pages->CustomerPage.js
CustomerPage.js
import React from "react";
import CustomersListComponent from "../components/CustomerComponent/CustomersListComponent";

const CustomerPage = () => {
  return (
    <>
      <CustomersListComponent />
    </>
  );
};

export default CustomerPage;
- Open App.css file and replace with below code.
.data-table {
  box-shadow: rgba(0, 0, 0, 0.25) 5px 5px 15px 0px;
}
- Open App.js file and replace with below code.
import logo from "./logo.svg";
import "./App.css";
import "./App.css";
import { BrowserRouter, Route, Routes } from "react-router-dom";
import CustomerPage from "./pages/CustomerPage";
import { createBrowserHistory } from "history";

const defaultHistory = createBrowserHistory();
function App({ history = defaultHistory }) {
  return (
    <BrowserRouter>
      <Routes>
        <Route path="/" element={<CustomerPage />} />
        <Route path="/customers" element={<CustomerPage />} />
      </Routes>
    </BrowserRouter>
  );
}

export default App;
- Open index.js file and replace with below code.
import React from "react";
import ReactDOM from "react-dom/client";
//import ReactDOM from "react-dom";
import "./index.css";
import App from "./App";
import reportWebVitals from "./reportWebVitals";

window.renderCustomer = (masterId, history) => {
  const customerElement = ReactDOM.createRoot(
    document.getElementById(masterId)
  );

  customerElement.render(
    <React.StrictMode>
      <App history={history} />
    </React.StrictMode>
  );
};

window.unmountCustomer = (masterId) => {
  // unmount of remove component
  //debugger;
  //ReactDOM.unmountComponentAtNode(document.getElementById(masterId));
};

if (!document.getElementById("Customer-master")) {
  const root = ReactDOM.createRoot(document.getElementById("root"));
  root.render(
    <React.StrictMode>
      <App />
    </React.StrictMode>
  );
}

// If you want to start measuring performance in your app, pass a function
// to log results (for example: reportWebVitals(console.log))
// or send to an analytics endpoint. Learn more: https://bit.ly/CRA-vitals
reportWebVitals();
- Create another file inside src folder, name the file setupProxy.js and write below code for cors policy.
module.exports = (app) => {
  app.use((req, res, next) => {
    res.header("Access-Control-Allow-Origin", "*");
    next();
  });
};
- Create a file inside root directory and name the file config-overrides.js and write below code. Below code will override webpack of react.
module.exports = {
  webpack: (config, env) => {
    config.optimization.runtimeChunk = false;
    config.optimization.splitChunks = {
      cacheGroups: {
        default: false,
      },
    };

    config.output.filename = "static/js/[name].js";

    config.plugins[5].options.filename = "static/css/[name].css";
    config.plugins[5].options.moduleFilename = () => "static/css/main.css";
    return config;
  },
};
- Open package.json and replace “scripts” section with below code. This project going to be open on 3003 port.
"scripts": {
"start": "set PORT=3003 && react-app-rewired start",
"build": "react-app-rewired build",
"test": "react-app-rewired test",
"eject": "react-scripts eject"
},
- Now run the backend Customer.API project
- Go to the directory of customer-frontend application and run the following command.
npm start
- You will see the below output. It means customer service works fine.
Step 7: Configure master-frontend React Project
- Open the Terminal and install below libraries with below command.
npm install react-router-dom
npm install react-bootstrap bootstrap@5.1.3
npm install @trendmicro/react-sidenav
- Inside root directory create a file and name the file .env and write code.
REACT_APP_HEADER_HOST=http://localhost:3001
REACT_APP_PRODUCT_HOST=http://localhost:3002
REACT_APP_CUSTOMER_HOST=http://localhost:3003
- Inside the src directory create a js file to handle micro-frontend services, name the file MicroFrontend.js and write below code.
MicroFrontend.js
import React, { useEffect } from "react";

function MicroFrontend({ name, host, history }) {
  useEffect(() => {
    const scriptId = `micro-frontend-script-${name}`;

    const renderMicroFrontend = () => {
      window[`render${name}`](`${name}-master`, history);
    };

    if (document.getElementById(scriptId)) {
      renderMicroFrontend();
      return;
    }

    fetch(`${host}/asset-manifest.json`)
      .then((res) => res.json())
      .then((manifest) => {
        const script = document.createElement("script");
        script.id = scriptId;
        script.crossOrigin = "";
        script.src = `${host}${manifest.files["main.js"]}`;
        script.onload = () => {
          renderMicroFrontend();
        };
        document.head.appendChild(script);
      });

    return () => {
      window[`unmount${name}`] && window[`unmount${name}`](`${name}-master`);
    };
  });

  //debugger;
  return <main id={`${name}-master`} />;
}

MicroFrontend.defaultProps = {
  document,
  window,
};

export default MicroFrontend;
- Inside src directory create following four folders.
- assets
- common
- components
- micro-services
- Create a js file inside common folder for sidebar navigation and name the file SideNavbar.js and write below code.
import React from "react";
import { useLocation, useNavigate } from "react-router-dom";
import SideNav, { NavItem, NavIcon, NavText } from "@trendmicro/react-sidenav";

const SideNavbar = () => {
  const location = useLocation();
  const history = useNavigate();
  return (
    <SideNav className="sidenav">
      <SideNav
        onSelect={(selected) => {
          const to = "/" + selected;
          if (location.pathname !== to) {
            console.log("Path Name:", location.pathname);
            console.log("To:", to);
            history(to);
          }
        }}
      >
        <SideNav.Toggle />
        <SideNav.Nav defaultSelected="">
          <NavItem eventKey="home">
            <NavIcon>
              <i className="fa fa-fw fa-home" style= />
            </NavIcon>
            <NavText>Dashboard</NavText>
          </NavItem>

          <NavItem eventKey="product-list">
            <NavIcon>
              <i
                className="fa fa-fw fa-device"
                style=
              />
            </NavIcon>
            <NavText>Product</NavText>
          </NavItem>

          <NavItem eventKey="product-categories">
            <NavIcon>
              <i
                className="fa fa-fw fa-device"
                style=
              />
            </NavIcon>
            <NavText>Categories</NavText>
          </NavItem>

          <NavItem eventKey="customers">
            <NavIcon>
              <i
                className="fa fa-fw fa-device"
                style=
              />
            </NavIcon>
            <NavText>Customers</NavText>
          </NavItem>
        </SideNav.Nav>
      </SideNav>
    </SideNav>
  );
};

export default SideNavbar;
- Create a css file inside assets folder and name the file homeStyle.css and write below code.
@import url("https://fonts.googleapis.com/css2?family=Mulish:wght@200&display=swap");

/_ this is non resposive , please adjust for smaller screens before using_/

- {
  padding: 0;
  margin: 0;
  }

.container {
display: flex;

    /* width: 100vw;

height: 100vh; \*/
overflow: visible;
}

.span1 {
/_ border: rgb(149, 101, 228) solid 2px; _/
margin-top: 90px;
width: 100px;
height: 100px;
position: fixed;
border-radius: 50%;
transform: rotate(30deg) scale(1.5);
box-shadow: inset 10px 10px 10px rgba(0, 0, 0, 0.1),
15px 20px 20px rgba(0, 0, 0, 0.5),
inset -25px -20px 20px rgba(255, 255, 255, 0.3);
animation: anim 20s ease infinite;
}

.span2 {
/_ border: solid black 2px; _/
height: 100px;
width: 200px;
text-align: center;
font-size: 12vh;
color: rgb(193, 193, 218);
justify-content: center;
transform: translateX(300px) translateY(180px);
letter-spacing: 10px;
position: relative;
}

.span2 .medtext {
font-weight: 100;
text-shadow: 5px 5px 20px rgba(19, 133, 179, 0.5),
-10px 10px 20px rgba(255, 255, 255, 0.5);
z-index: 10;
}

.span2 .large {
font-size: 30vh;
font-weight: 200;
text-shadow: 10px 10px 20px rgba(19, 133, 179, 0.5),
-20px 20px 30px rgba(255, 255, 255, 0.5);
}

.span3 {
position: absolute;
bottom: 10px;
right: 20px;

    height: 120px;
    justify-content: center;

}

.span4 {
transform: translateY(80px) rotate(90deg) translateX(300px);
/_ border: solid red 2px; _/
height: 50px;
justify-content: center;
position: absolute;
}

.span4 h2 {
font-size: 80px;
font-weight: 10;
padding-bottom: 10px;
color: rgb(86, 86, 206);
text-shadow: 5px 5px 20px rgba(19, 133, 179, 0.5),
-10px 10px 10px rgba(255, 255, 255, 0.5);
}

.span3 h2 {
color: rgb(86, 86, 206);
}

.overflow {
position: absolute;
width: 85vh;
height: 85vh;

    background: rgba(117, 117, 224, 0.726);
    z-index: 5;
    top: 10vh;
    left: 5vh;
    border-radius: 50%;
    animation: animate 5s ease infinite;
    box-shadow: inset 10px -10px 30px rgba(0, 0, 0, 0.2),
        15px -20px 30px rgba(255, 255, 255, 0.5),
        inset -25px -20px 30px rgba(0, 0, 0, 0.3),
        -20px 20px 30px rgba(255, 255, 255, 0.37);

    display: flex;
    align-items: center;
    justify-content: center;

}

@keyframes animate {
0% {
transform: scale(0);
}

    40% {
        transform: scale(0.7);
    }

    60% {
        transform: scale(0.8);
    }

    100% {
        transform: scale(0);
    }

}

.hero {
color: rgb(49, 69, 185);
font-size: 9vh;
text-align: center;
font-weight: 100;
letter-spacing: 10px;
}

.span5 {
width: 70vh;
height: 70vh;
position: absolute;
right: 0;
border-bottom-left-radius: 100%;
border-top-width: 0px;
border-right-width: 0px;
box-shadow: inset 10px 10px 10px rgba(0, 0, 0, 0.1),
15px 20px 20px rgba(0, 0, 0, 0.5),
inset -25px -20px 20px rgba(255, 255, 255, 0.3);
position: absolute;
animation: anim 18s ease infinite;
}

.span6 {
width: 10vw;
height: 10vw;
position: absolute;
left: 40vw;
top: 20vh;
border-radius: 50%;
box-shadow: inset 10px 10px 10px rgba(0, 0, 0, 0.1),
15px 20px 20px rgba(0, 0, 0, 0.5),
inset -25px -20px 20px rgba(255, 255, 255, 0.3);
animation: anim 17s ease infinite;
}

.span7 {
width: 6vw;
height: 6vw;
position: absolute;
left: 80vw;
top: 80vh;
border-radius: 50%;
box-shadow: inset 10px 10px 10px rgba(0, 0, 0, 0.1),
15px 20px 20px rgba(0, 0, 0, 0.5),
inset -25px -20px 20px rgba(255, 255, 255, 0.3);
}

.body {
height: 100%;
background: turquoise;
}

.span3 h2 {
font-size: 50px;
bottom: 10px;
font-weight: 100;
}

.span7 {
animation: anim 10s ease infinite;
}

@keyframes anim {
50% {
transform: translateX(50px) scale(1.3) translateY(5px);
}
}
- Inside the component folder, create a js file name the file Home.js.
- Write below code in src -> component -> Home.js
import React from "react";
import "../assets/homeStyle.css";

export const Home = () => {
  return (
    <>
      <div style=>
        <div className="container">
          <div className="span1"></div>
          <div className="span2">
            <h2 className="medtext">Think</h2>

            <h2 className="large">Simple</h2>
          </div>
          <div className="span3">
            <h2>MAHEDEE.NET</h2>
          </div>
          <div className="span4">
            <h2>Learn</h2>
          </div>

          <div className="span5"></div>
          <div className="span6"></div>
          <div className="span7"></div>
        </div>

        <div className="overflow">
          <h1 className="hero">MAHEDEE.NET</h1>
        </div>
      </div>
    </>
  );
};
- Inside micro-services folder creates following js files.
- ProductMicroServices.js
- LayoutMicroServices.js
- CustomerMicroServices.js
ProductMicroServices.js
import MicroFrontend from "../MicroFrontend";

const { REACT_APP_PRODUCT_HOST: productHost } = process.env;

export function ProductList({ history }) {
  return <MicroFrontend history={history} host={productHost} name="Product" />;
}

export function CategoryList({ history }) {
  return <MicroFrontend history={history} host={productHost} name="Product" />;
}
LayoutMicroServices.js
import MicroFrontend from "../MicroFrontend";

const { REACT_APP_HEADER_HOST: headerHost } = process.env;

export function Header({ history }) {
  return <MicroFrontend history={history} host={headerHost} name="Header" />;
}
CustomerMicroServices.js
import MicroFrontend from "../MicroFrontend";

const { REACT_APP_CUSTOMER_HOST: customerHost } = process.env;

export function CustomerList({ history }) {
  return (
    <MicroFrontend history={history} host={customerHost} name="Customer" />
  );
}
- Add following import inside index.js file.
import "bootstrap/dist/css/bootstrap.min.css";
import "@trendmicro/react-sidenav/dist/react-sidenav.css";
- Add following css inside index.css file.
.sidenav---sidenav---\_2tBP {
  background-color: #375a83 !important;
}
- Update App.js file with following code.
import { BrowserRouter, Routes, Route } from "react-router-dom";
//import TopNav from "./common/TopNav";
import SideNavbar from "./common/SideNavbar";
import { Home } from "./components/Home";
import {
  ProductList,
  CategoryList,
} from "./micro-services/ProductMicroServices";
import { Header } from "./micro-services/LayoutMicroServices";
import { CustomerList } from "./micro-services/CustomerMicroServices";

function App() {
  return (
    <>
      <BrowserRouter>
        <Header />
        <SideNavbar />
        <div style=>
          <Routes>
            <Route path="/" element={<Home />} />
            <Route path="/home" element={<Home />} />
            <Route path="/product-list" element={<ProductList />} />
            <Route path="/product-categories" element={<CategoryList />} />
            <Route path="/customers" element={<CustomerList />} />
          </Routes>
        </div>
      </BrowserRouter>
    </>
  );
}

export default App;
- Now run all other backend and frontend application.
- Now go inside of master-frontend application and run following command
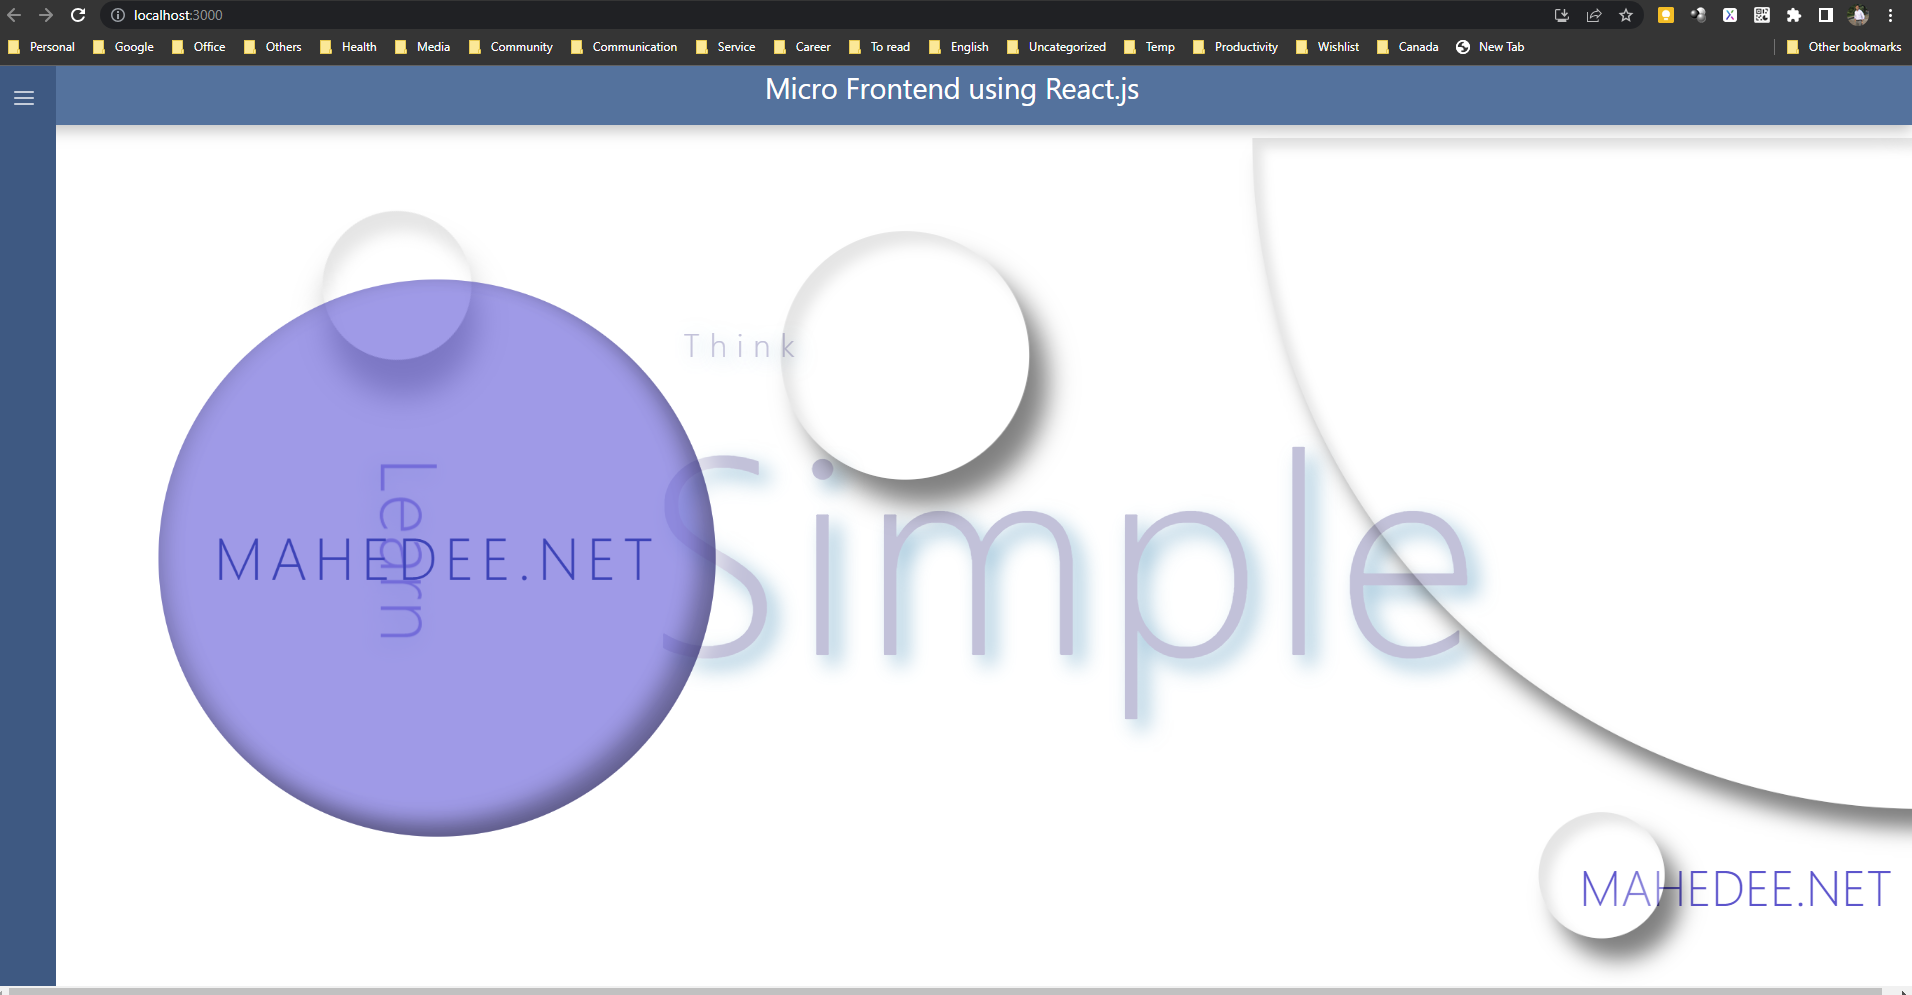
- Now the output (dashboard) look like following.
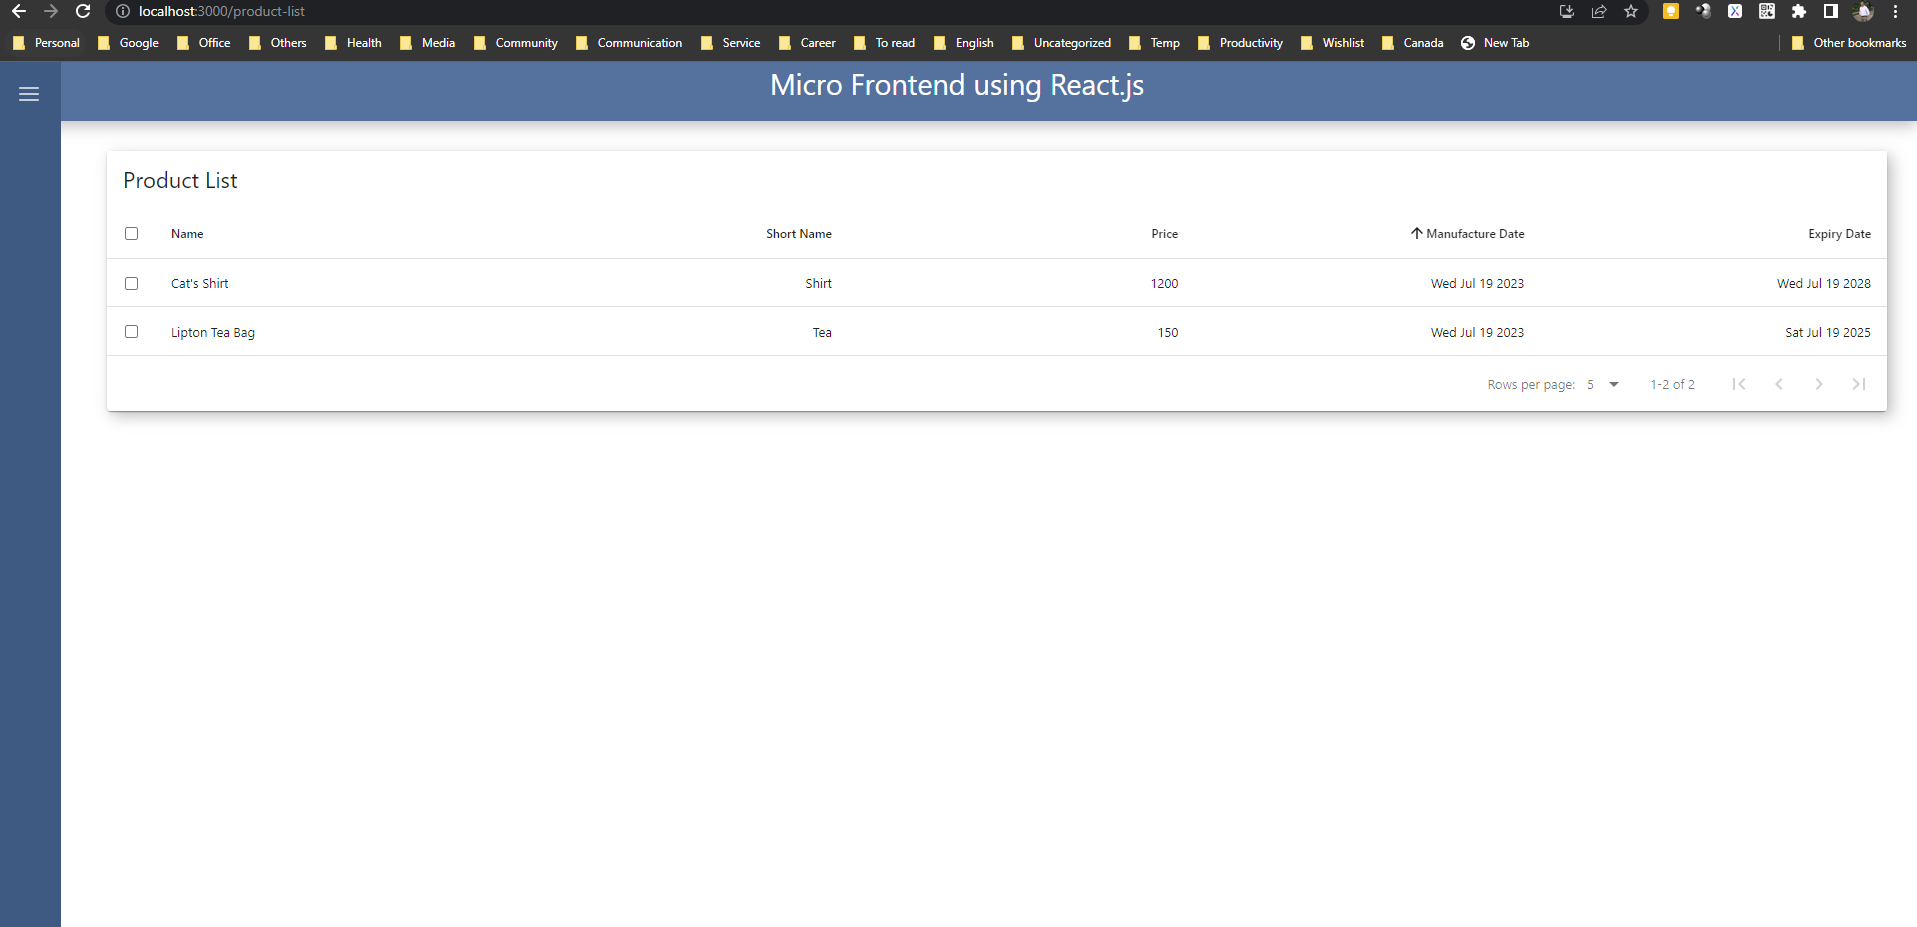
- Now click on Product menu you will get the following output
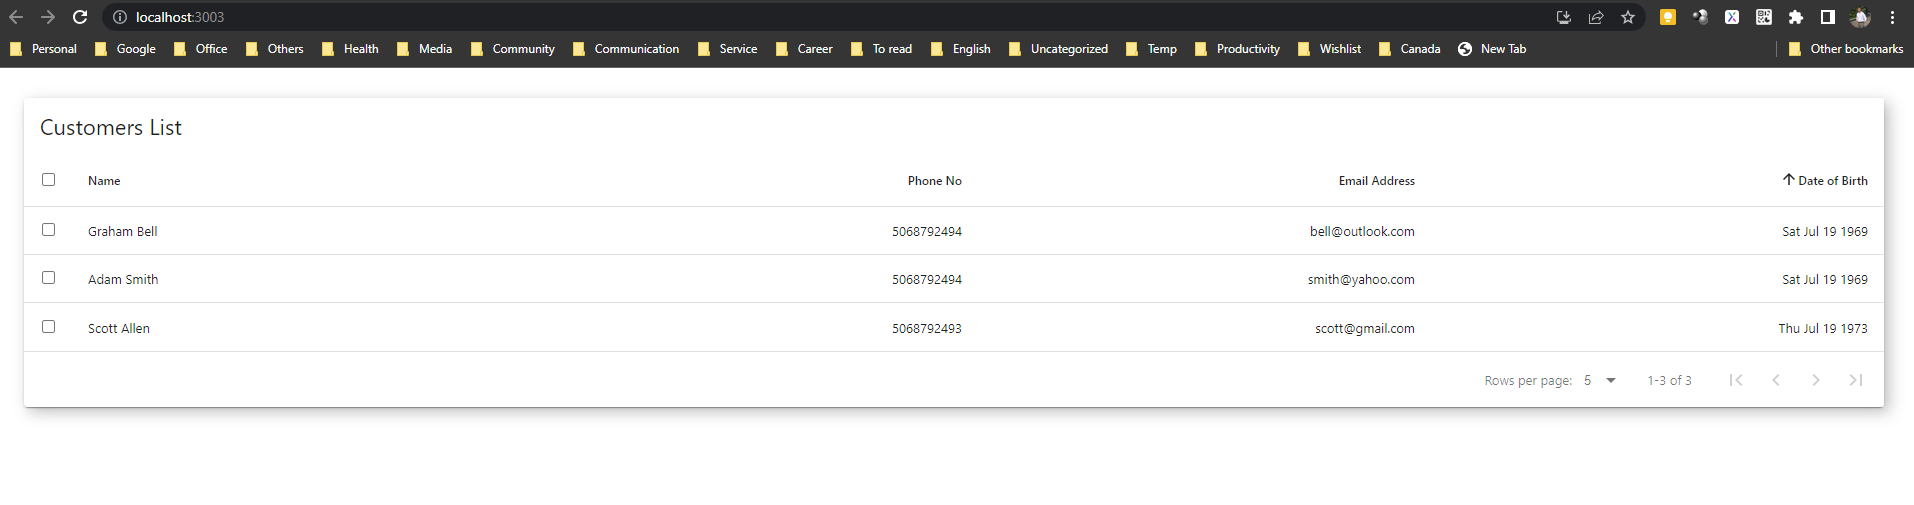
- Now click on Customer menu you will get the following output

- Now click on Categories menu you will get the following output
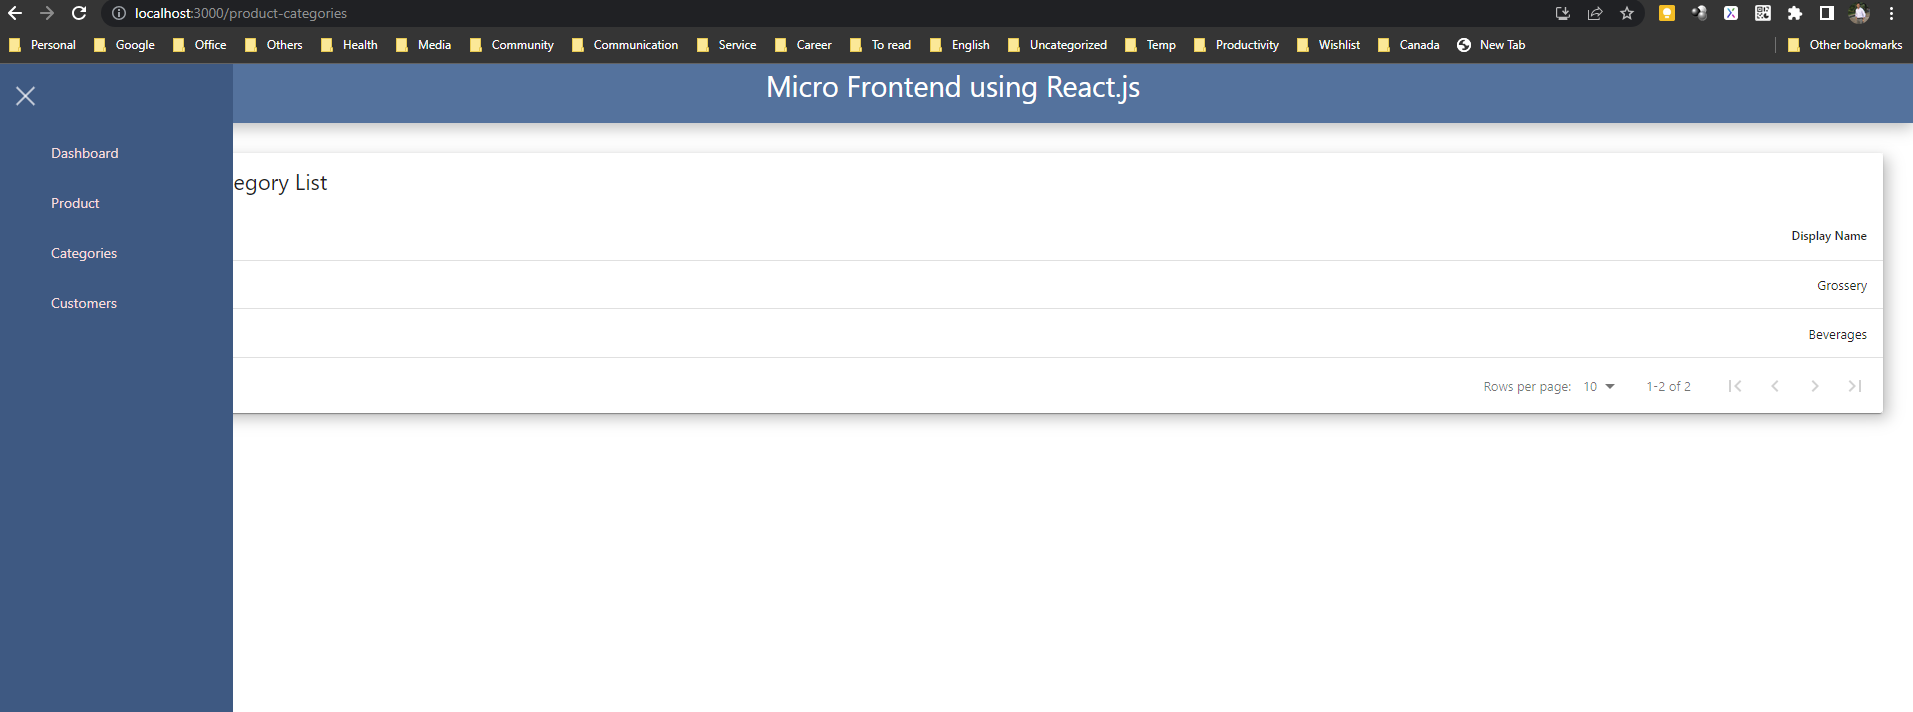
It means. Micro front end works. Our master application is running on 3000 port and other 3 application is running on 3001, 3002 and 3003. Wow, we accomplished the journey of micro front end.

Comments