
Middleware in ASP.NET Core: Why It Matters and How to Build Custom Middleware with a Real-World Examples
Modern web applications must handle cross-cutting concerns such as logging, authentication, security, exception handling, and request tracing. In ASP.NET Core, middleware is the key architectural component that makes all of this possible in a clean, modular, and scalable way.
This article explains what middleware is, why it is important, its benefits, and how custom middleware is used in real-world and enterprise applications, with practical examples.
What Is Middleware in ASP.NET Core?
Middleware in ASP.NET Core is a software component that sits between the incoming HTTP request and the outgoing HTTP response. Each middleware component:
- Receives an HTTP request
- Can perform some logic
- Can pass the request to the next middleware
- Can perform logic again when the response is returned
Request Pipeline Concept
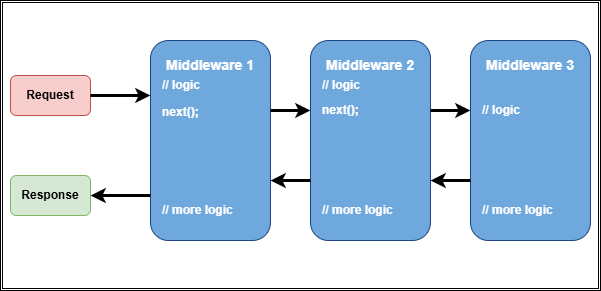
Each middleware decides:
- Whether to pass the request forward
- Whether to short-circuit the pipeline
Benefits of Middleware in ASP.NET Core
Middleware provides several important benefits:
-
Separation of Concerns Cross-cutting concerns (logging, security, error handling) are separated from business logic.
-
Reusability Middleware components can be reused across multiple applications. For example, authentication middleware can be shared.
-
Centralized Control Common logic like authentication, headers, or exception handling is implemented in one place.
-
Ordered Execution Middleware runs in a defined order, giving precise control over request handling.
-
Performance Optimization Requests can be terminated early (for example, unauthorized requests), saving resources.
Why Middleware Is Important?
Without middleware:
- Logging code would be duplicated everywhere
- Security logic would pollute controllers
- Error handling would be inconsistent
- Applications would become hard to maintain
Middleware enables:
- Clean architecture
- Maintainable code
- Enterprise-grade scalability
- Observability and diagnostics
In modern APIs and microservices, middleware is not optional—it is foundational.
Built-in Middleware Components in ASP.NET Core
ASP.NET Core provides many built-in middleware components.
1. Exception Handling Middleware
app.UseExceptionHandler("/error");
Used to handle unhandled exceptions globally. Here /error is the endpoint that returns a standardized error response. Real-world use: Enterprise applications use centralized error handling to return consistent error responses and log incidents.
2. Authentication and Authorization
app.UseAuthentication();
app.UseAuthorization();
Real-world use: Validates JWT tokens or OAuth credentials before requests reach controllers.
3. Logging Middleware
app.UseHttpLogging();
Real-world use: Tracks incoming requests and outgoing responses for auditing and debugging.
4. CORS Middleware
app.UseCors();
Real-world use: Allows controlled access to APIs from frontend applications.
What Is Custom Middleware in ASP.NET Core?
Custom middleware is middleware that you write yourself to handle application-specific or domain-specific requirements.
You create custom middleware when:
- Built-in middleware does not meet your needs
- You want reusable cross-cutting logic
- You need centralized enterprise behavior
Why Use Custom Middleware?
ASP.NET Core’s built-in middleware covers many common scenarios, but custom middleware allows you to address specific needs unique to your application or organization.
Custom middleware provides several advantages:
- Eliminates duplicated logic
- Enforces enterprise standards
- Improves security and observability
- Simplifies controllers
- Enables consistent behavior across APIs
How to Create Custom Middleware
Basic Custom Middleware Example
Here RequestLoggingMiddleware logs request paths and response statuses. _next is a delegate to the next middleware in the pipeline which is invoked after logging the request. InvokeAsync is the method called for each HTTP request which performs the logging and calls the next middleware. This method is called automatically for each HTTP request.
public class RequestLoggingMiddleware
{
    private readonly RequestDelegate _next;

    public RequestLoggingMiddleware(RequestDelegate next)
    {
        _next = next;
    }

    public async Task InvokeAsync(HttpContext context)
    {
        Console.WriteLine($"Request Path: {context.Request.Path}");

        await _next(context);

        Console.WriteLine($"Response Status: {context.Response.StatusCode}");
    }
}
Registering Middleware
app.UseMiddleware<RequestLoggingMiddleware>();
Real-World Custom Middleware Examples
1. Correlation ID Middleware (Enterprise Tracing)
Used in distributed systems to trace requests across services.
public class CorrelationIdMiddleware
{
    private const string HeaderName = "X-Correlation-ID";
    private readonly RequestDelegate _next;

    public CorrelationIdMiddleware(RequestDelegate next)
    {
        _next = next;
    }

    public async Task InvokeAsync(HttpContext context)
    {
        if (!context.Request.Headers.TryGetValue(HeaderName, out var correlationId))
        {
            correlationId = Guid.NewGuid().ToString();
            context.Request.Headers[HeaderName] = correlationId;
        }

        context.Response.Headers[HeaderName] = correlationId;
        await _next(context);
    }
}
Enterprise use: Used in microservices with tools like Seq, ELK, Application Insights.
2. API Key Validation Middleware
public class ApiKeyMiddleware
{
    private readonly RequestDelegate _next;
    private const string ApiKeyHeader = "X-API-KEY";

    public ApiKeyMiddleware(RequestDelegate next)
    {
        _next = next;
    }

    public async Task InvokeAsync(HttpContext context)
    {
        if (!context.Request.Headers.ContainsKey(ApiKeyHeader))
        {
            context.Response.StatusCode = StatusCodes.Status401Unauthorized;
            return;
        }

        await _next(context);
    }
}
Real-world use: Used in B2B integrations where OAuth is unnecessary.
3. Tenant Resolution Middleware (Multi-Tenant SaaS)
public class TenantMiddleware
{
    private readonly RequestDelegate _next;

    public TenantMiddleware(RequestDelegate next)
    {
        _next = next;
    }

    public async Task InvokeAsync(HttpContext context)
    {
        var tenantId = context.Request.Headers["X-Tenant-ID"];
        context.Items["TenantId"] = tenantId;

        await _next(context);
    }
}
Enterprise use: Multi-tenant SaaS platforms where each request belongs to a specific tenant.
Create a real-world ASP.NET Core application to implement custom middleware
Use cases: In this section, we will walk through creating a custom middleware that logs request and response details, including execution time.
Step 1: Create an ASP.NET Core Project
- Open visual studio or your preferred IDE.
- Create a new ASP.NET Core Web API project name “MiddlewareExample”.
- Or, use the .NET CLI to create the project and add project to a solution file:
dotnet new webapi -n MiddlewareExample
cd MiddlewareExample
dotnet new sln -n MiddlewareSolution
dotnet sln MiddlewareSolution.sln add MiddlewareExample.csproj
Step 2: Implement Custom Middleware
- Create a new folder named “Middleware” in the project.
- Inside the “Middleware” folder, create a new class file named “RequestResponseLoggingMiddleware.cs” and add the following code:
using System.Diagnostics;

namespace MiddlewareExample.Middleware
{
    public class RequestResponseLoggingMiddleware
    {
        private readonly RequestDelegate _next;

        public RequestResponseLoggingMiddleware(RequestDelegate next)
        {
            _next = next;
        }

        public async Task InvokeAsync(HttpContext context)
        {
            var stopwatch = Stopwatch.StartNew();

            // Log Request details
            Console.WriteLine($"Incoming Request: {context.Request.Method} {context.Request.Path}");

            await _next(context);

            stopwatch.Stop();

            // Log Response details
            Console.WriteLine($"Outgoing Response: {context.Response.StatusCode} | Time Taken: {stopwatch.ElapsedMilliseconds} ms");
        }
    }
}
Step 3: Register Middleware in the Pipeline
- Open the “Program.cs” file and register the custom middleware in the HTTP request pipeline by adding the following line before
app.UseEndpoints(...):
app.UseMiddleware<RequestResponseLoggingMiddleware>();
My final “Program.cs” should look like this:
using MiddlewareExample.Middleware;
using Scalar.AspNetCore;

var builder = WebApplication.CreateBuilder(args);

// Add services to the container.
// Learn more about configuring OpenAPI at https://aka.ms/aspnet/openapi
builder.Services.AddOpenApi();

var app = builder.Build();

// Add the middleware to the HTTP request pipeline
app.UseMiddleware<RequestResponseLoggingMiddleware>();

// Configure the HTTP request pipeline.
if (app.Environment.IsDevelopment())
{
    app.MapOpenApi();
    app.MapScalarApiReference();
}

app.UseHttpsRedirection();

var summaries = new[]
{
    "Freezing", "Bracing", "Chilly", "Cool", "Mild", "Warm", "Balmy", "Hot", "Sweltering", "Scorching"
};

app.MapGet("/weatherforecast", () =>
{
    var forecast =  Enumerable.Range(1, 5).Select(index =>
        new WeatherForecast
        (
            DateOnly.FromDateTime(DateTime.Now.AddDays(index)),
            Random.Shared.Next(-20, 55),
            summaries[Random.Shared.Next(summaries.Length)]
        ))
        .ToArray();
    return forecast;
})
.WithName("GetWeatherForecast");

app.Run();

record WeatherForecast(DateOnly Date, int TemperatureC, string? Summary)
{
    public int TemperatureF => 32 + (int)(TemperatureC / 0.5556);
}
Step 4: Run the Application
- Run the application using Visual Studio or the .NET CLI:
dotnet run
Step 5: Test the Middleware
- Use a tool like Postman or curl to send requests to the API endpoints. For example, browse to
http://localhost:5113/weatherforecastor any other endpoint defined in your API. - Observe the console output to see the logged request and response details along with the execution time.
- Sample output in the console:
Outgoing Response: 404 | Time Taken: 10 ms
Incoming Request: GET /swagger
Outgoing Response: 404 | Time Taken: 0 ms
Incoming Request: GET /scalar/v1
Outgoing Response: 200 | Time Taken: 16 ms
Incoming Request: GET /scalar/scalar.js
Outgoing Response: 200 | Time Taken: 30 ms
Incoming Request: GET /openapi/v1.json
Outgoing Response: 200 | Time Taken: 96 ms
Incoming Request: GET /weatherforecast
Outgoing Response: 200 | Time Taken: 13 ms
Incoming Request: GET /favicon.ico
Outgoing Response: 404 | Time Taken: 0 ms
Understanding Middleware Execution Order The order in which middleware components are added to the pipeline matters. Middleware is executed in the order it is registered. For example, if you have authentication middleware before logging middleware, the logging middleware will only log requests that have passed authentication.
Here is an example of middleware registration order:
app.UseAuthentication(); // Authentication middleware
app.UseMiddleware<RequestResponseLoggingMiddleware>(); // Custom logging middleware
app.UseAuthorization(); // Authorization middleware
Conclusion Middleware is a powerful feature of ASP.NET Core that enables developers to handle cross-cutting concerns in a clean and modular way. By leveraging both built-in and custom middleware, you can create scalable, maintainable, and enterprise-grade web applications.
Feel free to share your thoughts or questions in the comments below! Please share this article if you found it helpful. Happy coding!

Comments