Introduction To OData Services Using ASP.NET Web API
What is OData?
OData Stands for Open Data Protocol. It is a data access protocol for the web. OData provides a uniform way to query and manipulate data sets through CRUD operations (create, read, update, and delete). OData consumption can be done across different Programming Language. ASP.NET Web API supports both OData v3 and V4.
Advantages of OData Services
- OData based on REST Architecture so we can retrieve data using URL
- Support CRUD Operation using HTTP Method like GET, POST, PUT, DELETE
- Support HTTP, JSON and Atom Pub
- It is very light weight, so interaction of client and server is very fast
Disadvantage
- Since it is URL based so many people think it is less secure
- It does not support all type of custom query
- Let’s implement OData Services using ASP.NET Web API
Tools and Technology used
I used following tools and technology to develop the project –
- Visual Studio 2013
- Visual C#
- ASP.NET Web API 2
- Entity Framework 6
- Postman(Google postman)
Step 1: Create a ASP.net Web API Project
- Open visual studio and then go File -> Project -> ASP.NET Web Application
- select Web API and press OK
Step 2: Install Microsoft.AspNet.Odata
- Select Tool -> NuGet Package Manager > Package Manager Console
- Type following command in package manager console
PM> Install-Package Microsoft.AspNet.OdataStep 3: Create a model class name Employee
Create a Model class name Employee in Model folder
public class Employee
{
    public int Id { get; set; }
    public string Name { get; set; }
    public string Designation { get; set; }
    public string Dept { get; set; }
    public string BloodGroup { get; set; }
}
Step 4: Change or Add Connection String
Change or Add connection string in Web.config
<add name="DefaultConnection" connectionString="Data Source=(LocalDb)\v11.0;AttachDbFilename=|DataDirectory|\HRMDB.mdf;Initial Catalog=HRMDB;Integrated Security=True" providerName="System.Data.SqlClient" />
Step 5: Create a Context class
- Create HRMContext class in Model folder.
  public class HRMContext : DbContext
  {
      public HRMContext()
          : base("DefaultConnection")
      {
      }
      public DbSet<Employee> Employees { get; set; }
  }
Step 6: Add Employee Controller
-
Press right button on Controller folder -> Add -> Controller
- Now choose “Web API 2 OData v3 Controller with actions, using Entity Framework” scaffolding template and then press Add.
- Now choose Controller Name as EmployeeController, Model name as Employee and Context name as HRMContext and click Add.
- The following code will be generated on corresponding for the controller.
public class EmployeeController : ODataController
{
private HRMContext db = new HRMContext();
// GET: odata/Employee
[EnableQuery]
public IQueryable<Employee> GetEmployee()
{
return db.Employees;
}
// GET: odata/Employee(5)
[EnableQuery]
public SingleResult<Employee> GetEmployee([FromODataUri] int key)
{
return SingleResult.Create(db.Employees.Where(employee => employee.Id == key));
}
// PUT: odata/Employee(5)
public IHttpActionResult Put([FromODataUri] int key, Delta<Employee> patch)
{
Validate(patch.GetEntity());
if (!ModelState.IsValid)
{
return BadRequest(ModelState);
}
Employee employee = db.Employees.Find(key);
if (employee == null)
{
return NotFound();
}
patch.Put(employee);
try
{
db.SaveChanges();
}
catch (DbUpdateConcurrencyException)
{
if (!EmployeeExists(key))
{
return NotFound();
}
else
{
throw;
}
}
return Updated(employee);
}
// POST: odata/Employee
public IHttpActionResult Post(Employee employee)
{
if (!ModelState.IsValid)
{
return BadRequest(ModelState);
}
db.Employees.Add(employee);
db.SaveChanges();
return Created(employee);
}
// PATCH: odata/Employee(5)
[AcceptVerbs("PATCH", "MERGE")]
public IHttpActionResult Patch([FromODataUri] int key, Delta<Employee> patch)
{
Validate(patch.GetEntity());
if (!ModelState.IsValid)
{
return BadRequest(ModelState);
}
Employee employee = db.Employees.Find(key);
if (employee == null)
{
return NotFound();
}
patch.Patch(employee);
try
{
db.SaveChanges();
}
catch (DbUpdateConcurrencyException)
{
if (!EmployeeExists(key))
{
return NotFound();
}
else
{
throw;
}
}
return Updated(employee);
}
// DELETE: odata/Employee(5)
public IHttpActionResult Delete([FromODataUri] int key)
{
Employee employee = db.Employees.Find(key);
if (employee == null)
{
return NotFound();
}
db.Employees.Remove(employee);
db.SaveChanges();
return StatusCode(HttpStatusCode.NoContent);
}
protected override void Dispose(bool disposing)
{
if (disposing)
{
db.Dispose();
}
base.Dispose(disposing);
}
private bool EmployeeExists(int key)
{
return db.Employees.Count(e => e.Id == key) > 0;
}
}
Step 7: Configure OData End Point
- Open the file App_Start/WebApiConfig.cs.
- Add the following references
using System.Web.Http.OData.Builder;
using System.Web.Http.OData.Extensions;
using Web.OData.Models;
- Add the following code in the register method.
public static class WebApiConfig
{
  public static void Register(HttpConfiguration config)
  {
    ODataConventionModelBuilder builder = new ODataConventionModelBuilder();
    builder.EntitySet<Employee>("Employee");
    config.Routes.MapODataServiceRoute("odata", "odata", builder.GetEdmModel());
  }
}
Step 8: Enable Migration
- Type the following command in package manager console to enable migration
PM> Enable-Migrations -ContextTypeName HRMContext - After pressing enter you will see a class name Configuration is created in Mingrations folder with some codes.
Step 9: Add seed data and add migration
- Modify the Seed() method of Configuration class like below to add some seed data.
        protected override void Seed(Web.OData.Models.HRMContext context)
        {

            context.Employees.AddOrUpdate(
              p => p.Name,
              new Employee { Name = "Mahedee Hasan", Designation = "Software Architect", Dept = "SSD", BloodGroup = "A+" },
              new Employee { Name = "Kazi Aminur Rashid", Designation = "AGM", Dept = "SSD", BloodGroup = "NA" },
              new Employee { Name = "Tauhidul Haque", Designation = "DGM", Dept = "SSD", BloodGroup = "A+" }
            );

}
- Now type the following command in the package manager console to add a migration.
PM> Add-Migration initialmigration
Step 10: Update database and attaché mdf file
- Now type the following command in package manager console.
PM> Update-Database –Verbose -
You will see two file .mdf and .ldf is created in your App_data directory. Now attached the file to your application.
- Now run you application.
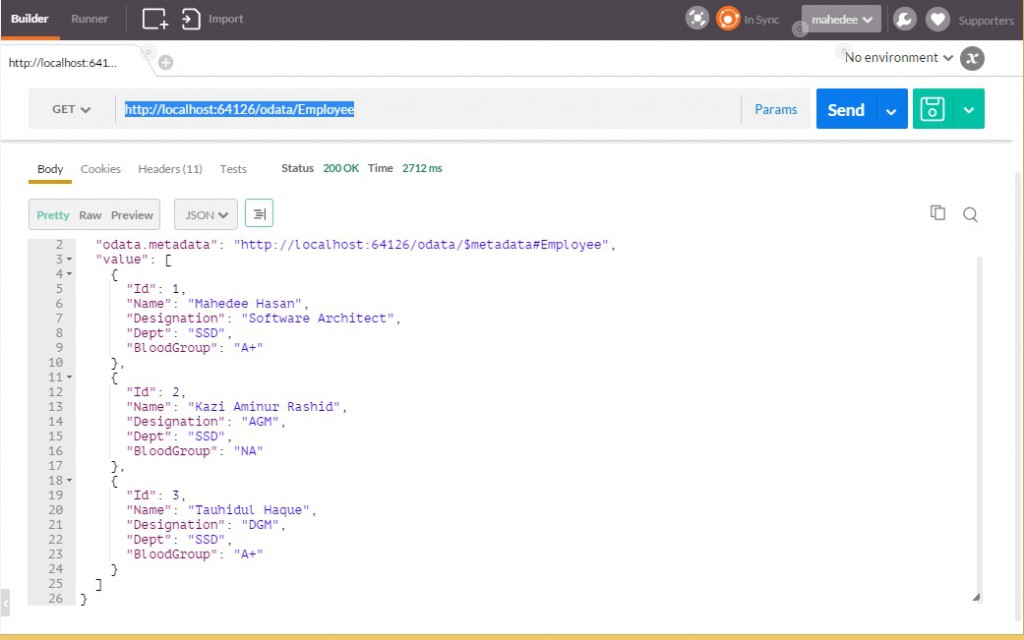
- Run Postman.
- Type http://localhost:64126/odata/Employee in your postbox you will see following output in JSON format. Use port number on which your application currently running instead of 64126.

Now, it’s working…!! Cheers!!!


Comments