Configure service mesh using Istio with an asp.net core applications on Kubernetes
Overview
A service mesh is a configurable infrustructure layer. It have capabilities to handle service-to-service communication, resilency, and many cross-cutting concerns. Proxy is a key component of service mesh. Sidecar proxy is injected in each services in this concept. Here I will show you service mesh communication using Istio with asp.net core applications on Kubernetes environment.
Istio is an open platform for providing a uniform way to integrate microservices, manage traffic flow accross microservices, enforce policies and aggregate telemetry data. Istio uses following tools -
- Prometheus: It monitors everything in the cluster.
- Grafana: Data visualization tools.
- Jaeger: It’s used for distributed tracing.
Tools and Technology used
The following tools and technologies used to configure Istio
- Visual Studio 2022
- Visual C#
- ASP.NET Core Web API
- Ocelot
- Docker desktop
- Kubernetes
- Istio
Let’s configure Istio on asp.net core web api applications.
Step 1: Download Istio
- Go to the link below and download “istio-1.12.2-win.zip”
https://github.com/istio/istio/releases/tag/1.12.2
or download and extract the latest release automatically (Linux or macOS): curl -L https://istio.io/downloadIstio | sh -
-
Extract zip file and move to the Istio Package directory. For example, istio-1.12.2.
-
Then installation directory contains:
- Sample applications in sample/directory
- The istioctl client binary in the bin/directory
Step 2: Add istioctl client to your path
- Use the following command in git bash to add istioctl client to your path.
export PATH=$PWD/bin:$PATH
Note: The above command doesn’t run on powershell. So, use git bash. If you close the git bash, istioctl doesn’t work. You have to run the above command again.
- To check istioctl client use the following command in git bash.
istioctl
Step 3: Install Istio
- For installation, we use the demo configuration profile. It’s selected to have a good set of defaults for testing, but there are other profiles for production or performance testing. Use below command to install Istio.
istioctl install --set profile=demo -y
- Use the following command to verify Istio.
kubectl get all -n istio-system
Output:
NAME                                        READY   STATUS    RESTARTS   AGE
pod/istio-egressgateway-c9cbbd99f-wk265     1/1     Running   0          87s
pod/istio-ingressgateway-7c8bc47b49-xpvvc   1/1     Running   0          86s
pod/istiod-765596f7ff-2p72v                 1/1     Running   0          3m13s

NAME                           TYPE           CLUSTER-IP       EXTERNAL-IP   PORT(S)                                                                      AGE
service/istio-egressgateway    ClusterIP      10.101.157.106   <none>        80/TCP,443/TCP                                                               85s
service/istio-ingressgateway   LoadBalancer   10.109.205.109   localhost     15021:32149/TCP,80:30563/TCP,443:30960/TCP,31400:32369/TCP,15443:32309/TCP   85s
service/istiod                 ClusterIP      10.109.211.149   <none>        15010/TCP,15012/TCP,443/TCP,15014/TCP                                        3m12s

NAME                                   READY   UP-TO-DATE   AVAILABLE   AGE
deployment.apps/istio-egressgateway    1/1     1            1           87s
deployment.apps/istio-ingressgateway   1/1     1            1           86s
deployment.apps/istiod                 1/1     1            1           3m13s

NAME                                              DESIRED   CURRENT   READY   AGE
replicaset.apps/istio-egressgateway-c9cbbd99f     1         1         1       87s
replicaset.apps/istio-ingressgateway-7c8bc47b49   1         1         1       86s
replicaset.apps/istiod-765596f7ff                 1         1         1       3m13s
Step 4: Configure for auto proxy injection
- Add a namespace label to instruct Istio to automatically inject Envoy sidecar proxies when you deploy your application later. Use below command to configure default namespance with Istio sidecar proxy.
kubectl label namespace default istio-injection=enabled
- Check label by using below command
kubectl describe namespace default
Step 5: Create asp.net core applications
- Create 4 asp.net core web api projects.
- Projects names are Catalog.API, Location.API, Ordering.API and BFF.Web.
Step 6: Organize Catalog.API Project
- Add the following nuget packages in the project.
Install-Package Microsoft.EntityFrameworkCore.InMemory
Install-Package Microsoft.EntityFrameworkCore.SqlServer
Install-Package Microsoft.EntityFrameworkCore.Tools
- Add a model class name Product in the model folder.
Product.cs
using System.ComponentModel.DataAnnotations;
using System.ComponentModel.DataAnnotations.Schema;

namespace Catalog.API.Model
{
    public class Product
    {
        [Key]
        [DatabaseGenerated(DatabaseGeneratedOption.Identity)]
        public int Id { get; set; }
        public string Name { get; set; }

        public string Description { get; set; }

        public decimal Price { get; set; }

        public int AvailableStock { get; set; }

        public int RestockThreshold { get; set; }
    }
}
- Add CatalogContext class in Db folder.
CatalogContext.cs
using Catalog.API.Model;
using Microsoft.EntityFrameworkCore;

namespace Catalog.API.Db
{
    public class CatalogContext : DbContext
    {
        public CatalogContext(DbContextOptions<CatalogContext> options) : base(options)
        {

        }
        protected override void OnConfiguring(DbContextOptionsBuilder optionsBuilder)
        {
            base.OnConfiguring(optionsBuilder);
        }

        public DbSet<Product> Products { get; set; }
    }
}
- Configure InMemory database and modify Program class as follows.
Program.cs
using Catalog.API.Db;
using Microsoft.EntityFrameworkCore;

var builder = WebApplication.CreateBuilder(args);

// Add services to the container.

builder.Services.AddControllers();

builder.Services.AddDbContext<CatalogContext>(opt => opt.UseInMemoryDatabase("CatalogDB"));

// Learn more about configuring Swagger/OpenAPI at https://aka.ms/aspnetcore/swashbuckle
builder.Services.AddEndpointsApiExplorer();
builder.Services.AddSwaggerGen();

var app = builder.Build();

// Configure the HTTP request pipeline.
if (app.Environment.IsDevelopment())
{
    app.UseSwagger();
    app.UseSwaggerUI();
}

app.UseHttpsRedirection();

app.UseAuthorization();

app.MapControllers();

app.Run();
- Create ProductsController in Controllers folder
ProductsController.cs
#nullable disable
using Catalog.API.Db;
using Catalog.API.Model;
using Microsoft.AspNetCore.Mvc;
using Microsoft.EntityFrameworkCore;

namespace Catalog.API.Controllers
{
    [Route("api/[controller]")]
    [ApiController]
    public class ProductsController : ControllerBase
    {
        private readonly CatalogContext _context;

        public ProductsController(CatalogContext context)
        {
            _context = context;
        }

        // GET: api/Products
        [HttpGet("GetAll")]
        public async Task<ActionResult<IEnumerable<Product>>> GetProducts()
        {
            return await _context.Products.ToListAsync();
        }

        // GET: api/Products/5
        [HttpGet("{id}")]
        public async Task<ActionResult<Product>> GetProduct(int id)
        {
            var product = await _context.Products.FindAsync(id);

            if (product == null)
            {
                return NotFound();
            }

            return product;
        }

        // PUT: api/Products/5
        // To protect from overposting attacks, see https://go.microsoft.com/fwlink/?linkid=2123754
        [HttpPut("Edit/{id}")]
        public async Task<IActionResult> PutProduct(int id, Product product)
        {
            if (id != product.Id)
            {
                return BadRequest();
            }

            _context.Entry(product).State = EntityState.Modified;

            try
            {
                await _context.SaveChangesAsync();
            }
            catch (DbUpdateConcurrencyException)
            {
                if (!ProductExists(id))
                {
                    return NotFound();
                }
                else
                {
                    throw;
                }
            }

            return NoContent();
        }

        // POST: api/Products
        // To protect from overposting attacks, see https://go.microsoft.com/fwlink/?linkid=2123754
        [HttpPost("Add")]
        public async Task<ActionResult<Product>> PostProduct(Product product)
        {
            _context.Products.Add(product);
            await _context.SaveChangesAsync();

            return CreatedAtAction("GetProduct", new { id = product.Id }, product);
        }

        // DELETE: api/Products/5
        [HttpDelete("Delete/{id}")]
        public async Task<IActionResult> DeleteProduct(int id)
        {
            var product = await _context.Products.FindAsync(id);
            if (product == null)
            {
                return NotFound();
            }

            _context.Products.Remove(product);
            await _context.SaveChangesAsync();

            return NoContent();
        }

        private bool ProductExists(int id)
        {
            return _context.Products.Any(e => e.Id == id);
        }
    }
}
- Add Dockerfile in the Catalog.API Project
Dockerfile
FROM mcr.microsoft.com/dotnet/aspnet:6.0 AS base
WORKDIR /app
EXPOSE 80
EXPOSE 443

FROM mcr.microsoft.com/dotnet/sdk:6.0 AS build
WORKDIR /src
COPY ["/Catalog.API.csproj", "Catalog.API/"]
RUN dotnet restore "Catalog.API/Catalog.API.csproj"
WORKDIR "/src/Catalog.API"
COPY . .
WORKDIR "/src/Catalog.API"
RUN dotnet build "Catalog.API.csproj" -c Release -o /app/build

FROM build AS publish
RUN dotnet publish "Catalog.API.csproj" -c Release -o /app/publish

FROM base AS final
WORKDIR /app
COPY --from=publish /app/publish .
ENTRYPOINT ["dotnet", "Catalog.API.dll"]
- Go to director where dockerfile reside and run the following command to build docker image.
docker image build -t mahedee/catalog:1.0.1 .
Note: Don’t forgot to add . at the end of the command.
- To configure pod add the following to file with code in Deploy/k8s folder
deployment.yml
# Configure Deployment
apiVersion: apps/v1
kind: Deployment
metadata:
  name: catalogapi-deployment
spec:
  selector:
    matchLabels:
      app: catalogapi-pod
  template:
    metadata:
      labels:
        app: catalogapi-pod
    spec:
      containers:
      - name: catalogapi-container
        image: mahedee/catalog:1.0.1
        resources:
          limits:
            memory: "128Mi" # 128 mili bytes
            cpu: "500m"     # 500 mili cpu
        ports:
        - containerPort: 80
service.yml
# Configure service
apiVersion: v1
kind: Service
metadata:
  name: catalogapi-service
spec:
  selector:
    app: catalogapi-pod
  ports:
  - port: 8001
    targetPort: 80
  type: LoadBalancer # use LoadBalancer if you want to accesss out side of pod
- Go to the Deploy/k8s directory and run the following commands.
kubectl apply -f .\deployment.yml

kubectl apply -f .\service.yml
Step 7: Check pods have proxy auto-injected
- By default istio will be injected automatically under this namespace.
- Use the following command to check pods have proxy auto-injected.
kubectl get pods // To check pods
Output:
NAME                                      READY   STATUS    RESTARTS   AGE
catalogapi-deployment-68d56ccddd-sqfnj    2/2     Running   0          14m
- Show the catalogapi proxy setup using the following command
kubectl describe pods catalogapi-deployment-68d56ccddd-sqfnj
- Find all proxy container using the following command
docker container ls --filter name=istio-proxy_*
- Check proxy processes for the locationapi
docker container ls --filter name=istio-proxy_catalogapi-deployment* -q
Step 8: Organize Location.API
- Create a Controller name CountriesController in the Controllers folder as follows.
CountriesController.cs
using Microsoft.AspNetCore.Mvc;

namespace Location.API.Controllers
{
    [ApiController]
    [Route("api/[controller]")]
    public class CountriesController : ControllerBase
    {
      [HttpGet("GetAll")]
      public IEnumerable<string> Get()
        {
            return new string[] {"America","Bangladesh", "Canada" };
        }
    }
}
- Add docker file in the project root directory as follows.
Dockerfile
FROM mcr.microsoft.com/dotnet/aspnet:6.0 AS base
WORKDIR /app
EXPOSE 80
EXPOSE 443

ENV ASPNETCORE_URLS=http://*:80;
ENV ASPNETCORE_ENVIRONMENT=Development

FROM mcr.microsoft.com/dotnet/sdk:6.0 AS build
WORKDIR /src

COPY ["/Location.API.csproj", "Location.API/"]
RUN dotnet restore "Location.API/Location.API.csproj"

WORKDIR "/src/Location.API"
COPY . .
WORKDIR "/src/Location.API"
RUN dotnet build "Location.API.csproj" -c Release -o /app/build

FROM build AS publish
RUN dotnet publish "Location.API.csproj" -c Release -o /app/publish

FROM base AS final
WORKDIR /app
COPY --from=publish /app/publish .
ENTRYPOINT ["dotnet", "Location.API.dll"]
- Go to the root directory where Dockerfile reside and run the following command to build docker image.
docker image build -t mahedee/location:1.0.1 .
- To configure pod add the following to file with code in Deploy/k8s folder
deployment.yml
apiVersion: apps/v1
kind: Deployment
metadata:
  name: locationapi-deployment
spec:
  selector:
    matchLabels:
      app: locationapi-pod
  template:
    metadata:
      labels:
        app: locationapi-pod
    spec:
      containers:
      - name: locationapi-container
        image: mahedee/location:1.0.1
        resources:
          limits:
            memory: "128Mi" # 128 mili bytes
            cpu: "500m"     # 500 mili cpu
        ports:
        - containerPort: 80
service.yml
apiVersion: v1
kind: Service
metadata:
  name: locationapi-service
spec:
  selector:
    app: locationapi-pod
  ports:
  - port: 8002
    targetPort: 80
  #type: LoadBalancer
- Go to the Deploy/k8s directory and run the following commands.
kubectl apply -f .\deployment.yml

kubectl apply -f .\service.yml
Step 9: Organize Ordering.API
- Add the following nuget packages in the project.
Install-Package Microsoft.EntityFrameworkCore.InMemory
Install-Package Microsoft.EntityFrameworkCore.SqlServer
Install-Package Microsoft.EntityFrameworkCore.Tools
- Create Order class in Models folders as follows.
Order.cs
namespace Ordering.API.Models
{
    public class Order
    {
        public int Id { get; set; }
        public string Address { get; set; }

        public DateTime OrderDate { get; set; }

        public string Comments { get; set; }
    }
}
- Create Ordering OrderingContext class in Db folder.
OrderingContext.cs
using Microsoft.EntityFrameworkCore;
using Ordering.API.Models;

namespace Ordering.API.Db
{
    public class OrderingContext : DbContext
    {
        public OrderingContext(DbContextOptions<OrderingContext> options) : base(options)
        {

        }
        public DbSet<Ordering.API.Models.Order> Order { get; set; }
    }
}
- Modify Program.cs to add dbcontext.
Program.cs
using Microsoft.EntityFrameworkCore;
using Ordering.API.Db;

var builder = WebApplication.CreateBuilder(args);

// Add services to the container.

builder.Services.AddControllers();

builder.Services.AddDbContext<OrderingContext>(opt => opt.UseInMemoryDatabase("CatalogDB"));

// Learn more about configuring Swagger/OpenAPI at https://aka.ms/aspnetcore/swashbuckle
builder.Services.AddEndpointsApiExplorer();
builder.Services.AddSwaggerGen();

var app = builder.Build();

// Configure the HTTP request pipeline.
if (app.Environment.IsDevelopment())
{
    app.UseSwagger();
    app.UseSwaggerUI();
}

app.UseHttpsRedirection();

app.UseAuthorization();

app.MapControllers();

app.Run();
- Create OrdersController in Controllers folder as follows.
#nullable disable
using Microsoft.AspNetCore.Mvc;
using Microsoft.EntityFrameworkCore;
using Ordering.API.Db;
using Ordering.API.Models;

namespace Ordering.API.Controllers
{
    [Route("api/[controller]")]
    [ApiController]
    public class OrdersController : ControllerBase
    {
        private readonly OrderingContext _context;

        public OrdersController(OrderingContext context)
        {
            _context = context;
        }

        // GET: api/Orders
        [HttpGet("GetAll")]
        public async Task<ActionResult<IEnumerable<Order>>> GetOrder()
        {
            return await _context.Order.ToListAsync();
        }

        // GET: api/Orders/5
        [HttpGet("{id}")]
        public async Task<ActionResult<Order>> GetOrder(int id)
        {
            var order = await _context.Order.FindAsync(id);

            if (order == null)
            {
                return NotFound();
            }

            return order;
        }

        // PUT: api/Orders/5
        // To protect from overposting attacks, see https://go.microsoft.com/fwlink/?linkid=2123754
        [HttpPut("Edit/{id}")]
        public async Task<IActionResult> PutOrder(int id, Order order)
        {
            if (id != order.Id)
            {
                return BadRequest();
            }

            _context.Entry(order).State = EntityState.Modified;

            try
            {
                await _context.SaveChangesAsync();
            }
            catch (DbUpdateConcurrencyException)
            {
                if (!OrderExists(id))
                {
                    return NotFound();
                }
                else
                {
                    throw;
                }
            }

            return NoContent();
        }

        // POST: api/Orders
        // To protect from overposting attacks, see https://go.microsoft.com/fwlink/?linkid=2123754
        [HttpPost("Add")]
        public async Task<ActionResult<Order>> PostOrder(Order order)
        {
            _context.Order.Add(order);
            await _context.SaveChangesAsync();

            return CreatedAtAction("GetOrder", new { id = order.Id }, order);
        }

        // DELETE: api/Orders/5
        [HttpDelete("Delete/{id}")]
        public async Task<IActionResult> DeleteOrder(int id)
        {
            var order = await _context.Order.FindAsync(id);
            if (order == null)
            {
                return NotFound();
            }

            _context.Order.Remove(order);
            await _context.SaveChangesAsync();

            return NoContent();
        }

        private bool OrderExists(int id)
        {
            return _context.Order.Any(e => e.Id == id);
        }
    }
}
- Create Docker file in the root directory
Dockerfile
FROM mcr.microsoft.com/dotnet/aspnet:6.0 AS base
WORKDIR /app
EXPOSE 80
EXPOSE 443

ENV ASPNETCORE_URLS=http://*:80;
ENV ASPNETCORE_ENVIRONMENT=Development

FROM mcr.microsoft.com/dotnet/sdk:6.0 AS build
WORKDIR /src
COPY ["/Ordering.API.csproj", "Ordering.API/"]
RUN dotnet restore "Ordering.API/Ordering.API.csproj"
WORKDIR "/src/Ordering.API"
COPY . .
WORKDIR "/src/Ordering.API"
RUN dotnet build "Ordering.API.csproj" -c Release -o /app/build

FROM build AS publish
RUN dotnet publish "Ordering.API.csproj" -c Release -o /app/publish

FROM base AS final
WORKDIR /app
COPY --from=publish /app/publish .
ENTRYPOINT ["dotnet", "Ordering.API.dll"]
- Go to the directory where docker file exists and run the following command to build docker image.
docker image build -t mahedee/ordering:1.0.1 .
- To configure pod add the following to file with code in Deploy/k8s folder
deployment.yml
apiVersion: apps/v1
kind: Deployment
metadata:
  name: locationapi-deployment
spec:
  selector:
    matchLabels:
      app: locationapi-pod
  template:
    metadata:
      labels:
        app: locationapi-pod
    spec:
      containers:
      - name: locationapi-container
        image: mahedee/location:1.0.1
        resources:
          limits:
            memory: "128Mi" # 128 mili bytes
            cpu: "500m"     # 500 mili cpu
        ports:
        - containerPort: 80
service.yml
apiVersion: v1
kind: Service
metadata:
  name: orderingapi-service
spec:
  selector:
    app: orderingapi-pod
  ports:
  - port: 8003
    targetPort: 80
  type: LoadBalancer
- Go to the Deploy/k8s directory and run the following commands.
kubectl apply -f .\deployment.yml

kubectl apply -f .\service.yml
Step 10: Organize API Gateway BFF.Web
- Install the following nuget packages in the project.
Install-Package Ocelot
Install-Package Ocelot.Cache.CacheManager
- Add ocelot.json file to configure gateway
ocelot.json
{
  "Routes": [

    //---Catalog service : Start ------------//
    {
      "DownstreamPathTemplate": "/{url}",
      "DownstreamScheme": "http",
      "DownstreamHostAndPorts": [
        {
          "Host": "catalogapi-service",
          "Port": 8001
        }
      ],

      "UpstreamPathTemplate": "/Catalog/{url}",
      "UpstreamHttpMethod": [ "Get", "Post", "Put", "Delete" ]
    },

    //---Catalog service : End ------------//

    //---Location Service: Start ----------//
    {
      "DownstreamPathTemplate": "/{url}",
      "DownstreamScheme": "http",
      "DownstreamHostAndPorts": [
        {
          "Host": "locationapi-service",
          "Port": 8002
        }
      ],

      "UpstreamPathTemplate": "/Location/{url}",
      "UpstreamHttpMethod": [ "Get", "Post", "Put", "Delete" ]
    },

    //---Location Service: End ----------//


    //---Ordering Service: Start ----------//
    // Catch All Routing
    {
      "DownstreamPathTemplate": "/{url}",
      "DownstreamScheme": "http",
      "DownstreamHostAndPorts": [
        {
          "Host": "orderingapi-service",
          "Port": 8003
        }
      ],

      "UpstreamPathTemplate": "/Ordering/{url}",
      "UpstreamHttpMethod": [ "Get", "Post", "Put", "Delete" ]
    }

  ],

  //---Ordering Service: End ----------//

  //https://localhost:7282/api/Products/GetAll

  "GlobalConfiguration": {
    // enable request correleation id to capture request information
    "RequestIdKey": "X-Correlation-Id",
    "BaseUrl": "https://localhost:7205/"
  }
}
- Modify Program.cs to configure ocelot
Program.cs
using Ocelot.DependencyInjection;
using Ocelot.Middleware;
using Ocelot.Cache.CacheManager;


var builder = WebApplication.CreateBuilder(args);


var environment = Environment.GetEnvironmentVariable("ASPNETCORE_ENVIRONMENT");
builder.Configuration.SetBasePath(Directory.GetCurrentDirectory())
    .AddJsonFile("ocelot.json", optional: false, reloadOnChange: true)
    .AddEnvironmentVariables();


// Add services to the container.

builder.Services.AddControllers();
// Learn more about configuring Swagger/OpenAPI at https://aka.ms/aspnetcore/swashbuckle
builder.Services.AddEndpointsApiExplorer();

// Swagger for ocelot
//builder.Services.AddSwaggerForOcelot(builder.Configuration);
//builder.Services.AddSwaggerForOcelot();
builder.Services.AddSwaggerGen();

//For ocelot
builder.Services.AddOcelot()

    // Added for caching
    .AddCacheManager(x => {
        x.WithDictionaryHandle();
    });

var app = builder.Build();

// Configure the HTTP request pipeline.
if (app.Environment.IsDevelopment())
{
    app.UseSwagger();
    app.UseSwaggerUI();
    //app.UseSwaggerForOcelotUI();
}

app.UseOcelot();

app.UseHttpsRedirection();

app.UseAuthorization();

app.MapControllers();

app.Run();
- Add docker file in the root directory.
Dockerfile
#See https://aka.ms/containerfastmode to understand how Visual Studio uses this Dockerfile to build your images for faster debugging.

FROM mcr.microsoft.com/dotnet/aspnet:6.0 AS base
WORKDIR /app
EXPOSE 80
EXPOSE 443

ENV ASPNETCORE_URLS=http://*:80;
ENV ASPNETCORE_ENVIRONMENT=Development

FROM mcr.microsoft.com/dotnet/sdk:6.0 AS build
WORKDIR /src
COPY ["/BFF.Web.csproj", "BFF.Web/"]
RUN dotnet restore "BFF.Web/BFF.Web.csproj"

WORKDIR "/src/BFF.Web"
COPY . .
WORKDIR "/src/BFF.Web"
RUN dotnet build "BFF.Web.csproj" -c Release -o /app/build

FROM build AS publish
RUN dotnet publish "BFF.Web.csproj" -c Release -o /app/publish

FROM base AS final
WORKDIR /app
COPY --from=publish /app/publish .
ENTRYPOINT ["dotnet", "BFF.Web.dll"]
- Go to director where dockerfile reside and run the following command to build docker image.
docker image build -t mahedee/bff.web:1.0.1 .
- To configure pod and service add the following yml file with code in Deploy/k8s folder
deployment.yml
apiVersion: apps/v1
kind: Deployment
metadata:
  name: bffweb-deployment
spec:
  selector:
    matchLabels:
      app: bffweb-pod
  template:
    metadata:
      labels:
        app: bffweb-pod
    spec:
      containers:
      - name: bffweb-container
        image: mahedee/bff.web:1.0.1
        resources:
          limits:
            memory: "128Mi"
            cpu: "500m"
        ports:
        - containerPort: 80

---

apiVersion: v1
kind: Service
metadata:
  name: bffweb-service
spec:
  selector:
    app: bffweb-pod
  ports:
  - port: 8011
    targetPort: 80
  type: LoadBalancer
- Go to the Deploy/k8s directory and run the following commands.
kubectl apply -f .\deployment.yml
- Now you can running services using in the kubernetes using the following command
kubectl get svc
Output:
NAME                  TYPE           CLUSTER-IP       EXTERNAL-IP   PORT(S)          AGE
bffweb-service        LoadBalancer   10.111.186.235   localhost     8011:31690/TCP   10m
catalogapi-service    LoadBalancer   10.101.130.94    localhost     8001:30710/TCP   138m
kubernetes            ClusterIP      10.96.0.1        <none>        443/TCP          3d20h
locationapi-service   ClusterIP      10.100.204.33    <none>        8002/TCP         7m57s
orderingapi-service   LoadBalancer   10.96.12.11      localhost     8003:31264/TCP   15m
- You can now access catalog api, location api and ordering api using bffweb using the following URL
-
You can use postman for CRUD Operation
http://localhost:8011/Catalog/api/Products/GetAll
http://localhost:8011/Location/api/Countries/GetAll
http://localhost:8011/Ordering/api/Orders/GetAll
Visualizing Service Mesh
Step 11: Install Kiali dashboard
- Go to the Istio’s directory. Install Kiali and other addons and wait for them to be deployed. Execute below command inside Istio folder. Use Git bash instead of powershell.
kubectl apply -f samples/addons
- Execute below command and wait till get success roll out message.
kubectl rollout status deployment/kiali -n istio-system
Note: If there are errors trying to install the addons, try running the command again. There may be some timing issues which will be resolved when the command is run again.
- Verify the deployment with below command.
kubectl get po -n istio-system
Output:
NAME                                    READY   STATUS    RESTARTS   AGE
grafana-6ccd56f4b6-sc894                1/1     Running   0          13m
istio-egressgateway-c9cbbd99f-wk265     1/1     Running   0          87m
istio-ingressgateway-7c8bc47b49-xpvvc   1/1     Running   0          87m
istiod-765596f7ff-2p72v                 1/1     Running   0          89m
jaeger-5d44bc5c5d-g2wcl                 1/1     Running   0          13m
kiali-79b86ff5bc-cqwrp                  1/1     Running   0          13m
prometheus-64fd8ccd65-lglld             2/2     Running   0          13m
- Now run the Kiali dashboard using the below command
istioctl dashboard kiali
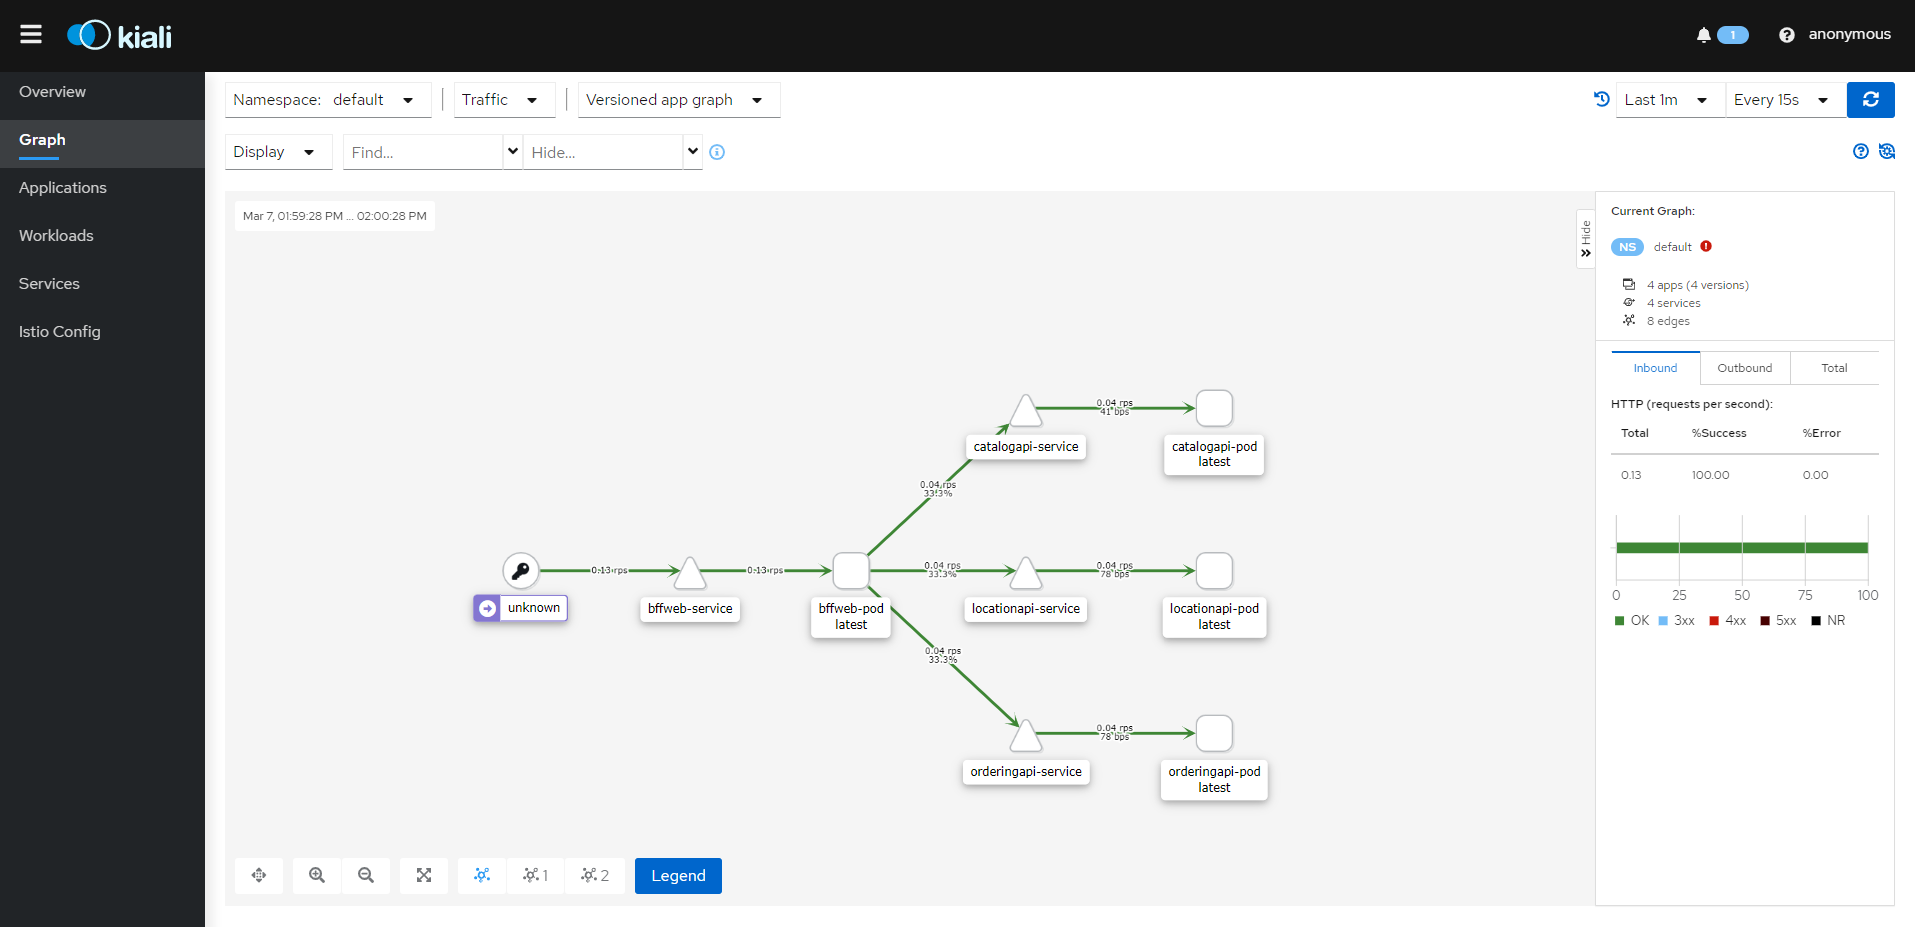
Kiali dashboard will be open. Hit the gateway URL. Use the following URL and hit several times and you will get the reflect in kiali dashbaord as below.
http://localhost:8011/Catalog/api/Products/GetAll
http://localhost:8011/Location/api/Countries/GetAll
http://localhost:8011/Ordering/api/Orders/GetAll
Step 12: Monitoring with Prometheus & Grafana
- Check Prometheus and Grafana is running using the following command.
kubectl get po -n istio-system
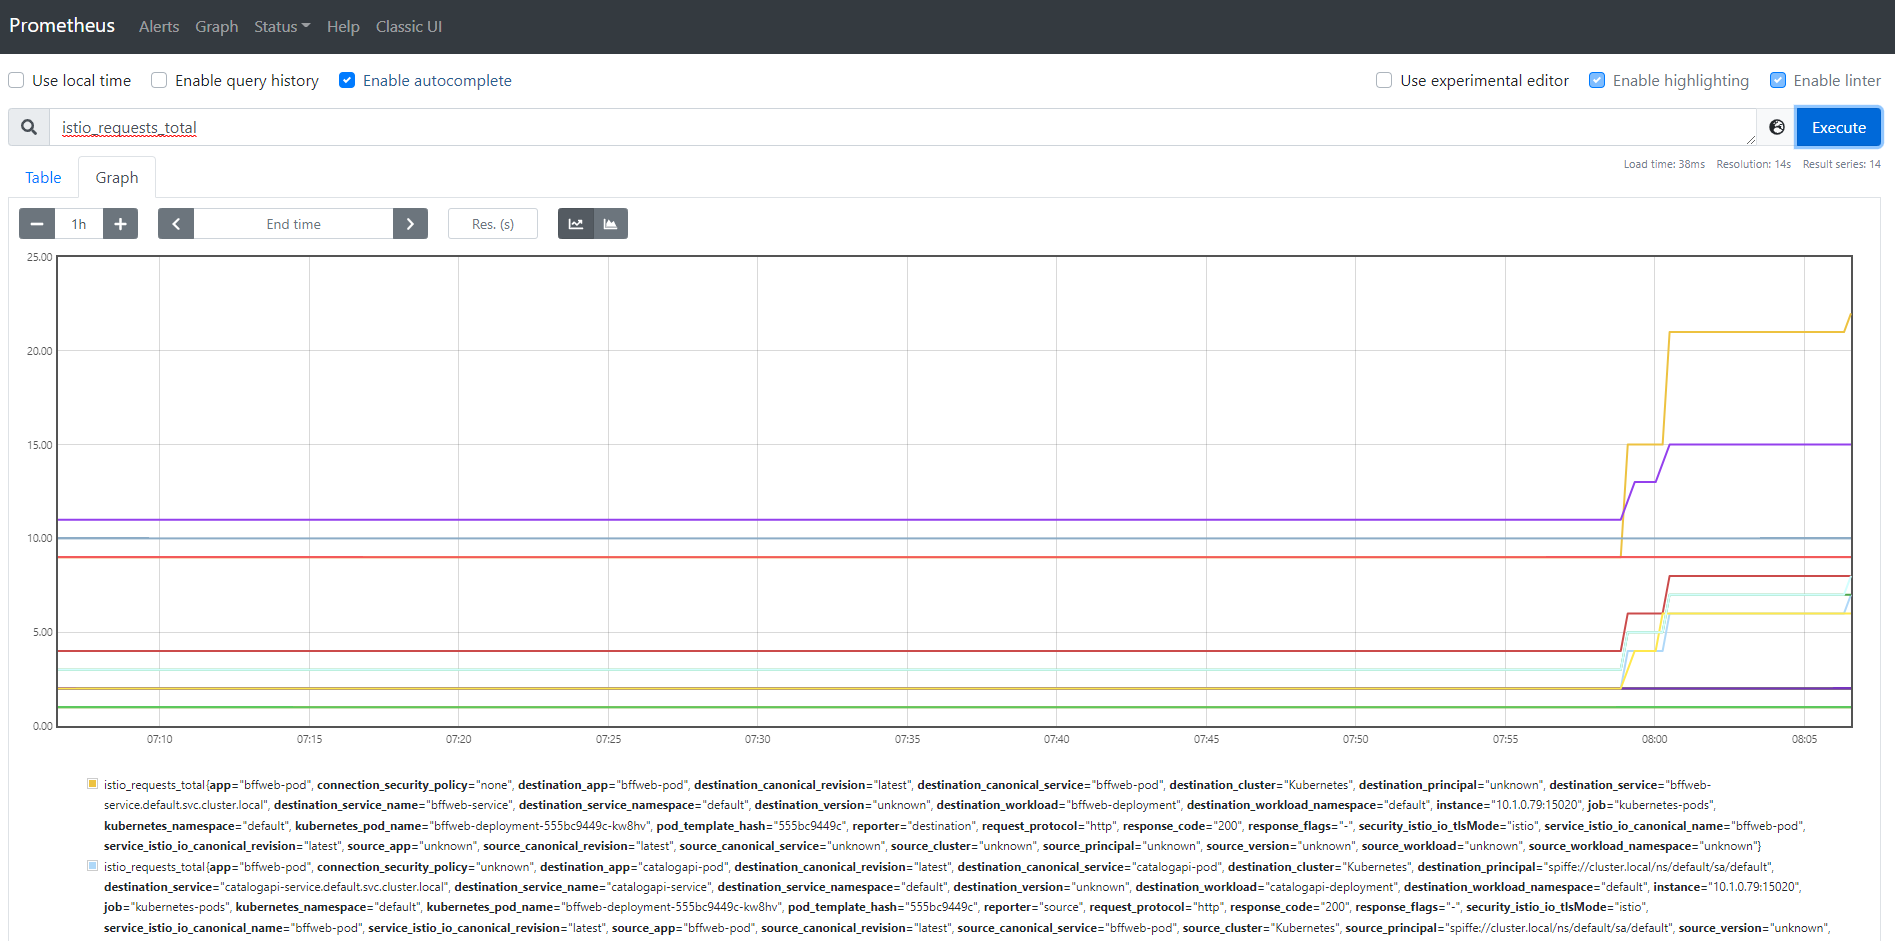
- Run Prometheus dashboard using the following command
istioctl dashboard prometheus
View graph in diffrent ways like -
- Select istio_requests_total.
- Switch to Graph.
- Check Status/Targets - Kubernetes service discovery.
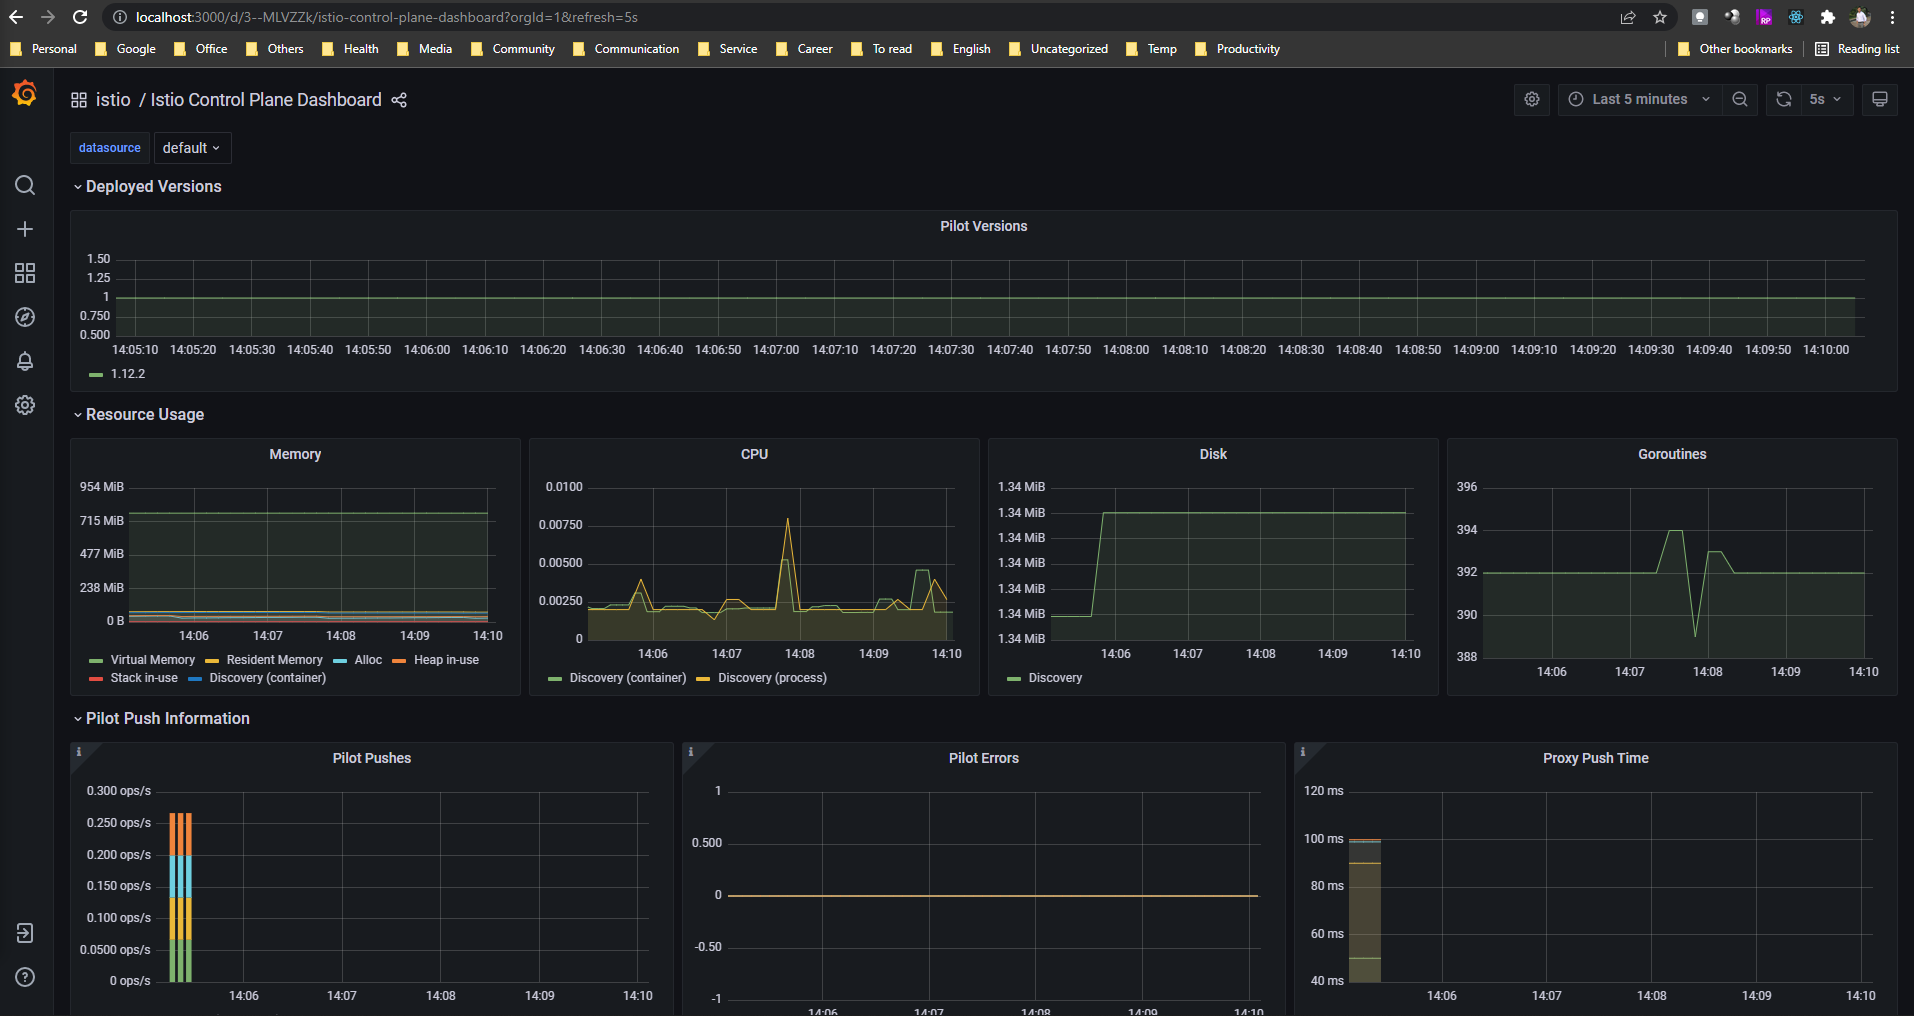
- Run Grafana dashboard using the following command
istioctl dashboard grafana
- Go to Dashboar->Manage->Istio and see the dashboar as below.
Step 13: Distributed Tracing using Jaegar UI
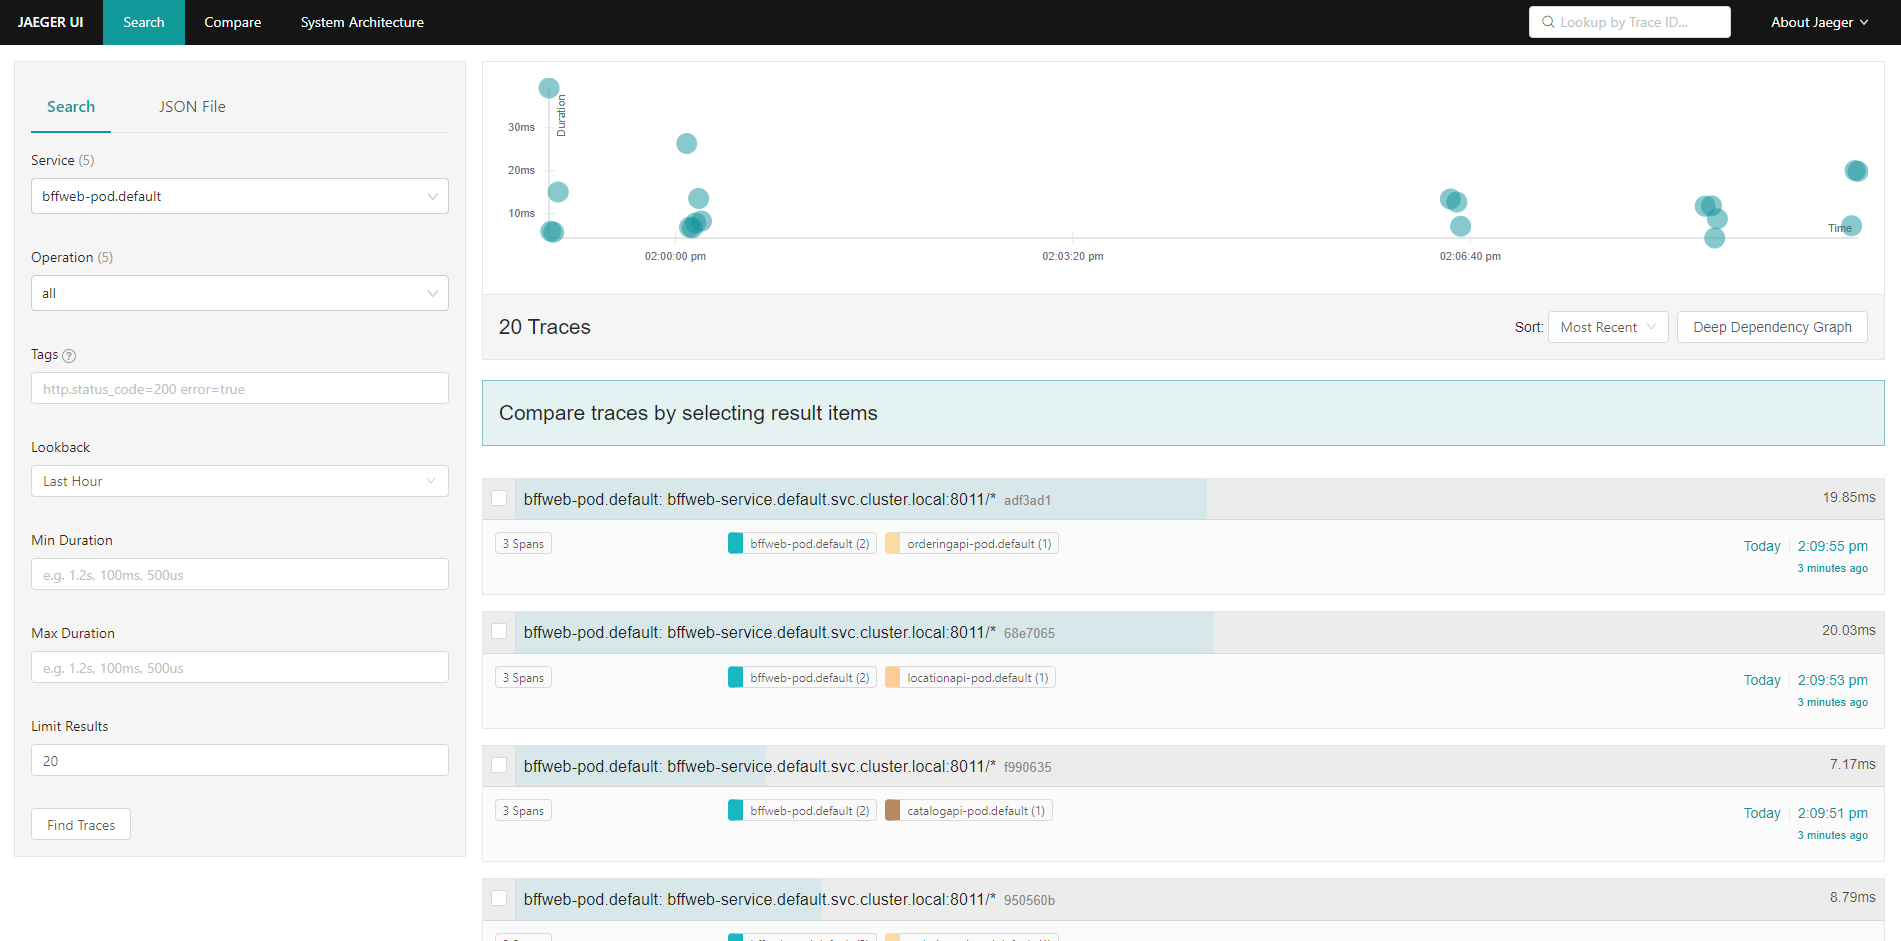
- Run Jaeger UI using the following command
istioctl dashboard jaeger
Step 14: Logging from Istio and Envoy
- Create a YAML file and name the file elasticsearch.yaml and write below code.
elasticsearch.yaml
# Logging Namespace. All below are a part of this namespace.
apiVersion: v1
kind: Namespace
metadata:
  name: logging
---
# Elasticsearch Service
apiVersion: v1
kind: Service
metadata:
  name: elasticsearch
  namespace: logging
  labels:
    app: elasticsearch
spec:
  ports:
  - port: 9200
    protocol: TCP
    targetPort: db
  selector:
    app: elasticsearch
---
# Elasticsearch Deployment
apiVersion: apps/v1
kind: Deployment
metadata:
  name: elasticsearch
  namespace: logging
  labels:
    app: elasticsearch
spec:
  replicas: 1
  selector:
    matchLabels:
      app: elasticsearch
  template:
    metadata:
      labels:
        app: elasticsearch
      annotations:
        sidecar.istio.io/inject: "false"
    spec:
      containers:
      - image: docker.elastic.co/elasticsearch/elasticsearch-oss:6.1.1
        name: elasticsearch
        resources:
          # need more cpu upon initialization, therefore burstable class
          limits:
            cpu: 1000m
          requests:
            cpu: 100m
        env:
          - name: discovery.type
            value: single-node
        ports:
        - containerPort: 9200
          name: db
          protocol: TCP
        - containerPort: 9300
          name: transport
          protocol: TCP
        volumeMounts:
        - name: elasticsearch
          mountPath: /data
      volumes:
      - name: elasticsearch
        emptyDir: {}
- Create a YAML file and name the file kibana.yaml and write below code.
kibana.yaml
# Kibana Service
apiVersion: v1
kind: Service
metadata:
  name: kibana
  namespace: logging
  labels:
    app: kibana
spec:
  ports:
  - port: 5601
    protocol: TCP
    targetPort: ui
  selector:
    app: kibana
---
# Kibana Deployment
apiVersion: apps/v1
kind: Deployment
metadata:
  name: kibana
  namespace: logging
  labels:
    app: kibana
spec:
  replicas: 1
  selector:
    matchLabels:
      app: kibana
  template:
    metadata:
      labels:
        app: kibana
      annotations:
        sidecar.istio.io/inject: "false"
    spec:
      containers:
      - name: kibana
        image: docker.elastic.co/kibana/kibana-oss:6.1.1
        resources:
          # need more cpu upon initialization, therefore burstable class
          limits:
            cpu: 1000m
          requests:
            cpu: 100m
        env:
          - name: ELASTICSEARCH_URL
            value: http://elasticsearch:9200
        ports:
        - containerPort: 5601
          name: ui
          protocol: TCP
---
apiVersion: networking.istio.io/v1alpha3
kind: Gateway
metadata:
  name: kibana-gateway
  namespace: logging
spec:
  selector:
    istio: ingressgateway
  servers:
  - port:
      number: 15033
      name: http-kibana
      protocol: HTTP
    hosts:
    - "*"
---
apiVersion: networking.istio.io/v1alpha3
kind: VirtualService
metadata:
  name: kibana-vs
  namespace: logging
spec:
  hosts:
  - "*"
  gateways:
  - kibana-gateway
  http:
  - match:
    - port: 15033
    route:
    - destination:
        host: kibana
        port:
          number: 5601
- Create a YAML file and name the file fluentd.yaml and write below code.
fluentd.yaml
apiVersion: v1
kind: ServiceAccount
metadata:
  name: fluentd
  namespace: kube-system
---
apiVersion: rbac.authorization.k8s.io/v1
kind: ClusterRole
metadata:
  name: fluentd
  namespace: kube-system
rules:
  - apiGroups:
      - ""
    resources:
      - pods
      - namespaces
    verbs:
      - get
      - list
      - watch
---
kind: ClusterRoleBinding
apiVersion: rbac.authorization.k8s.io/v1
metadata:
  name: fluentd
roleRef:
  kind: ClusterRole
  name: fluentd
  apiGroup: rbac.authorization.k8s.io
subjects:
  - kind: ServiceAccount
    name: fluentd
    namespace: kube-system
---
# Fluentd Service
apiVersion: v1
kind: Service
metadata:
  name: fluentd-es
  namespace: kube-system
  labels:
    app: fluentd-es
spec:
  ports:
    - name: fluentd-tcp
      port: 24224
      protocol: TCP
      targetPort: 24224
    - name: fluentd-udp
      port: 24224
      protocol: UDP
      targetPort: 24224
  selector:
    k8s-app: fluentd-logging
---
apiVersion: apps/v1
kind: DaemonSet
metadata:
  name: fluentd
  namespace: kube-system
  labels:
    k8s-app: fluentd-logging
    version: v1
    kubernetes.io/cluster-service: "true"
spec:
  selector:
    matchLabels:
      k8s-app: fluentd-logging
  template:
    metadata:
      labels:
        k8s-app: fluentd-logging
        version: v1
        kubernetes.io/cluster-service: "true"
    spec:
      serviceAccount: fluentd
      serviceAccountName: fluentd
      tolerations:
        - key: node-role.kubernetes.io/master
          effect: NoSchedule
      containers:
        - name: fluentd
          image: fluent/fluentd-kubernetes-daemonset:v1.3-debian-elasticsearch
          env:
            - name: FLUENT_ELASTICSEARCH_HOST
              value: "elasticsearch.logging"
            - name: FLUENT_ELASTICSEARCH_PORT
              value: "9200"
            - name: FLUENT_ELASTICSEARCH_SCHEME
              value: "http"
            - name: FLUENT_UID
              value: "0"
          resources:
            limits:
              memory: 200Mi
            requests:
              cpu: 100m
              memory: 200Mi
          volumeMounts:
            - name: varlog
              mountPath: /var/log
            - name: varlibdockercontainers
              mountPath: /var/lib/docker/containers
              readOnly: true
      terminationGracePeriodSeconds: 30
      volumes:
        - name: varlog
          hostPath:
            path: /var/log
        - name: varlibdockercontainers
          hostPath:
            path: /var/lib/docker/containers
- Now execute all above file with below commands.
kubectl apply -f elasticsearch.yaml

kubectl apply -f kibana.yaml

kubectl apply -f fluentd.yaml

kubectl get pods -n logging
- If you are using docker desktop you can use below command to port forward.
kubectl port-forward svc/kibana 8099:5601 -n logging
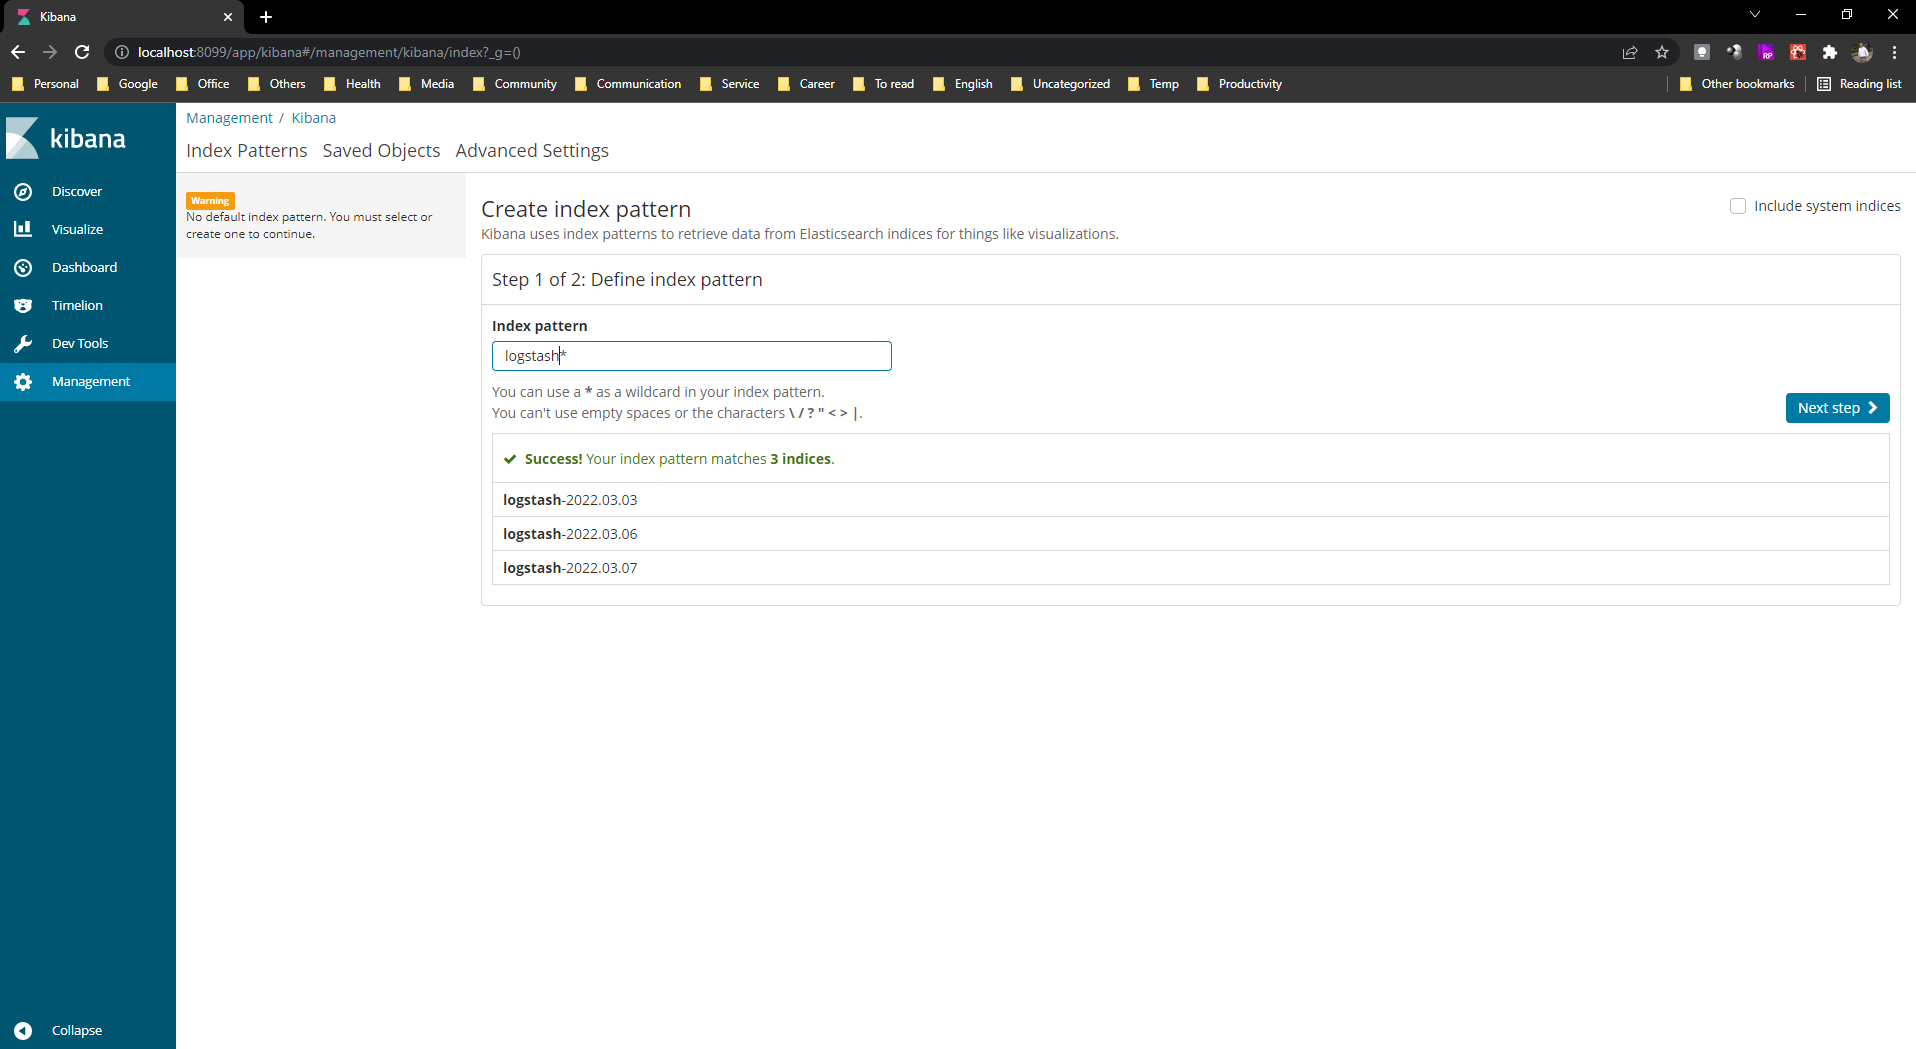
- Now browse kibana using http://localhost:8099/
Step 15: Configure Istio to Log to Fluentd
Now we are going to configure Istio to use the same FluentD instance, and send proxy logs through FluentD into Elasticsearch. It will be actual adapter configuration that I mentioned earler.
- Create a YAMl file and name the file fluentd-istio.yaml and write below code.
fluentd-istio.yaml
# Configuration for logentry instances
apiVersion: config.istio.io/v1alpha2
kind: instance
metadata:
  name: newlog
  namespace: istio-system
spec:
  compiledTemplate: logentry
  params:
    severity: '"info"'
    timestamp: request.time
    variables:
      source: source.labels["app"] | source.workload.name | "unknown"
      user: source.user | "unknown"
      destination: destination.labels["app"] | destination.workload.name | "unknown"
      responseCode: response.code | 0
      responseSize: response.size | 0
      latency: response.duration | "0ms"
    monitored_resource_type: '"UNSPECIFIED"'
---
# Configuration for a Fluentd handler
apiVersion: config.istio.io/v1alpha2
kind: handler
metadata:
  name: handler
  namespace: istio-system
spec:
  compiledAdapter: fluentd
  params:
    address: "fluentd-es.kube-system:24224"
---
# Rule to send logentry instances to the Fluentd handler
apiVersion: config.istio.io/v1alpha2
kind: rule
metadata:
  name: newlogtofluentd
  namespace: istio-system
spec:
  match: "true" # match for all requests
  actions:
   - handler: handler
     instances:
     - newlog
---
- Apply the below command
kubectl apply -f fluentd-istio.yaml
- Filter on search with kubernetes.container.name is istio-proxy and we will see logs fron istio proxy.
Some commands you may need
Kubectl Commands
kubectl get ns                   // Get all namesapces

kubectl get svc -n istio-system   // Get services under istio-system name space

kubectl get all -n istio-system   // Get all under istio-system name space

kubectl delete ns istio-system    // Delete namespace name istio-system

kubectl get all                   // Get everything in the kubernetes

kubectl delete --all pods         // Delete all pods

kubectl delete --all pods --namespace=foo  // Delete all pods under the namespace foo

kubectl delete --all deployments --namespace=foo // Delete all deployments under the namespace foo

kubectl delete --all namespaces  // Delete all name spaces

kubectl delete --all svc           // Delete all services

kubectl delete --all deployments    // Delete all deployments
Docker Commands
docker rm -vf $(docker ps -aq)     // To delete all containers including its volumes use

docker rmi -f $(docker images -aq)  // To delete all the images

docker images                       // To check docker images

docker image build -t mahedee/location:1.0.1 .  // create a docker image name mahedee/location:1.0.1

Comments