
Configure kubernetes single node cluster and deploy an asp.net core application using docker hub
Overview
Kubernetes is an open-source container orchestration system for automating software deployment, scaling, and management. Google orignially designed Kubernetes, but the Cloud Native Computing Foundation (CNCF) now maintains the project. In this article, I will show you how to configure kubernetese single node cluster on local environment and deploy an asp.net core application using docker hub.
Tools and Technology used
The following tools and technologies has been used for this application
- Visual Studio 2022
- Visual C#
- ASP.NET Core Web API
- Docker Desktop
Step 1: Install & Setup Hyper-V
- Go to Control Panel
- On your left panel, click on Programs
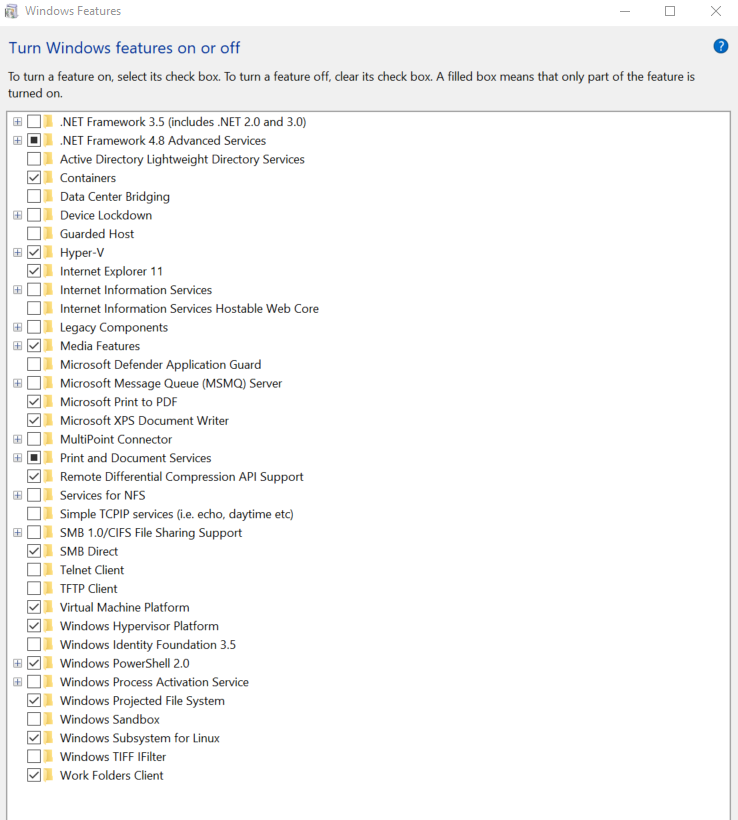
- Then click Programs and Features followed by Turn Windows features on and off.
- Check Hyper-V and Windows Hypervisor Platform
- Click OK
- Run the following command as Administrator on powershell and verify if Hyper-V is installed successfully on your machine:
Get-WindowsOptionalFeature -Online -FeatureName Microsoft-Hyper-V
Note: The above command didn’t work after installed WSL2 on Docker desktop. You may skip this step if you want to install latest version of Docker with WSL 2.
Step 2: Install Docker Desktop for Windows
Step 3: Install Kubectl
- Install and Set Up kubectl on Windows
- If you have installed Docker Desktop before, you have installed kubectl and Docker Desktop for windows added it to the PATH.
- Check installed kubectl version using the following command
kubectl version --short
Step 4: Install Kubernetes on Windows
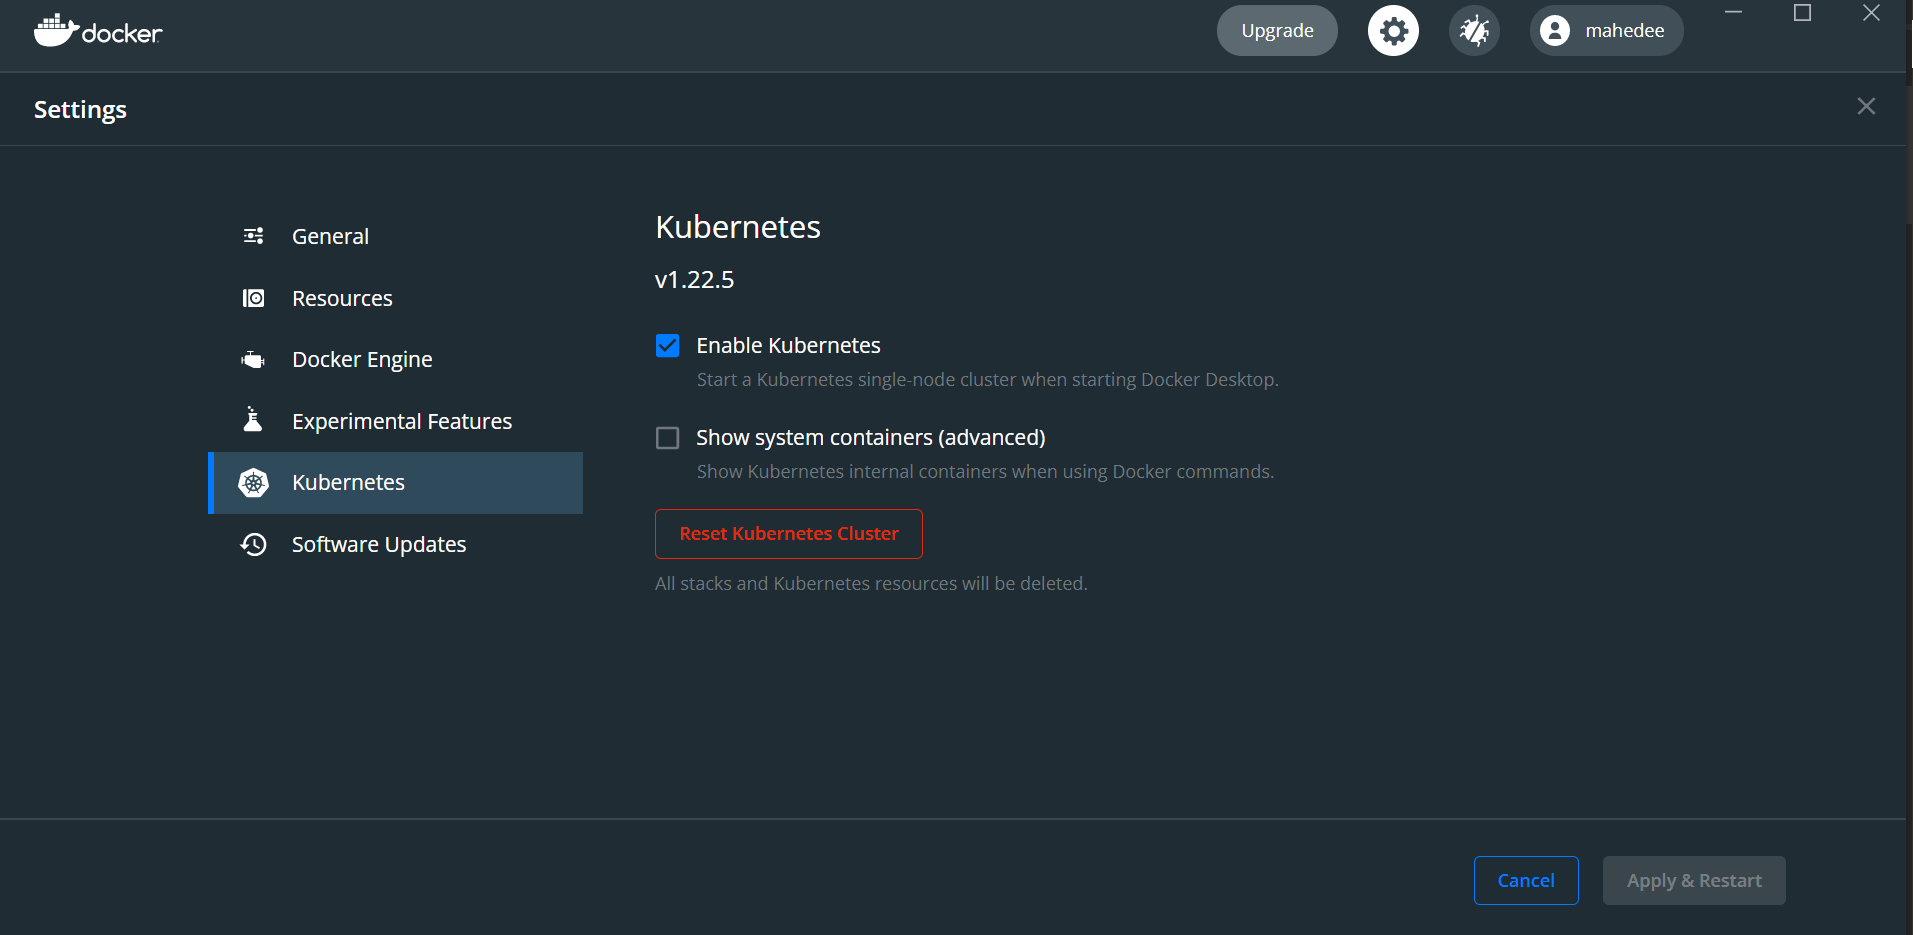
- Right-click on the Docker tray icon
- Click “Settings”
- On the left panel click “Kubernetes”
- Check Enable Kubernetes and click “Apply & Restart”
- Notes: Some commands you can check -
docker info
kubectl cluster-info
docker container ls
kubectl get nodes //shows list of nodes
Step 5: Login on docker hub
- Got docker hub and create and account it’s free.
- Login to your account from docker desktop.
Step 6: Create an ASP.NET core Web API Project
-
Open Visual Studio and Create an Web API Project. Ex. Catalog.API
-
Install the following packages in the project.
Install-Package Microsoft.EntityFrameworkCore
Install-Package Microsoft.EntityFrameworkCore.SqlServer
Install-Package Microsoft.EntityFrameworkCore.Tools
Install-Package Microsoft.VisualStudio.Web.CodeGeneration.Design
- Add Connection String on appsettings.json as follows
{
  "Logging": {
    "LogLevel": {
      "Default": "Information",
      "Microsoft.AspNetCore": "Warning"
    }
  },
  "AllowedHosts": "*",
  "ConnectionStrings": {
    "DefaultConnection": "Server=192.168.7.154;Database=Demo.CustomerDB;User Id=sa;Password=yourPassword;"
  }
}
- Create a model class name - Product Model in Models folder
Product.cs
using System.ComponentModel.DataAnnotations;
using System.ComponentModel.DataAnnotations.Schema;

namespace Catalog.API.Models
{
    public class Product
    {
        [Key]
        [DatabaseGenerated(DatabaseGeneratedOption.Identity)]
        public int Id { get; set; }
        public string Name { get; set; }

        public string Description { get; set; }

        public decimal Price { get; set; }

        public int AvailableStock { get; set; }

        public int RestockThreshold { get; set; }
    }
}
- Add CatalogDbContext class in Db folder as follows
CatalogDbContext.cs
using Microsoft.EntityFrameworkCore;

namespace Catalog.API.Db
{
    public class CatalogDbContext : DbContext
    {
        public CatalogDbContext(DbContextOptions<CatalogDbContext> options) : base(options)
        {

        }
        public DbSet<Catalog.API.Models.Product> Product { get; set; }
    }
}
- Create a Contoller class name ProductsController as follows
ProductsController.cs
#nullable disable
using Catalog.API.Db;
using Catalog.API.Models;
using Microsoft.AspNetCore.Mvc;
using Microsoft.EntityFrameworkCore;

namespace Catalog.API.Controllers
{
    [Route("api/[controller]")]
    [ApiController]
    public class ProductsController : ControllerBase
    {
        private readonly CatalogDbContext _context;

        public ProductsController(CatalogDbContext context)
        {
            _context = context;
        }

        // GET: api/Products
        [HttpGet]
        public async Task<ActionResult<IEnumerable<Product>>> GetProduct()
        {
            return await _context.Product.ToListAsync();
        }

        // GET: api/Products/5
        [HttpGet("{id}")]
        public async Task<ActionResult<Product>> GetProduct(int id)
        {
            var product = await _context.Product.FindAsync(id);

            if (product == null)
            {
                return NotFound();
            }

            return product;
        }

        // PUT: api/Products/5
        // To protect from overposting attacks, see https://go.microsoft.com/fwlink/?linkid=2123754
        [HttpPut("{id}")]
        public async Task<IActionResult> PutProduct(int id, Product product)
        {
            if (id != product.Id)
            {
                return BadRequest();
            }

            _context.Entry(product).State = EntityState.Modified;

            try
            {
                await _context.SaveChangesAsync();
            }
            catch (DbUpdateConcurrencyException)
            {
                if (!ProductExists(id))
                {
                    return NotFound();
                }
                else
                {
                    throw;
                }
            }

            return NoContent();
        }

        // POST: api/Products
        // To protect from overposting attacks, see https://go.microsoft.com/fwlink/?linkid=2123754
        [HttpPost]
        public async Task<ActionResult<Product>> PostProduct(Product product)
        {
            _context.Product.Add(product);
            await _context.SaveChangesAsync();

            return CreatedAtAction("GetProduct", new { id = product.Id }, product);
        }

        // DELETE: api/Products/5
        [HttpDelete("{id}")]
        public async Task<IActionResult> DeleteProduct(int id)
        {
            var product = await _context.Product.FindAsync(id);
            if (product == null)
            {
                return NotFound();
            }

            _context.Product.Remove(product);
            await _context.SaveChangesAsync();

            return NoContent();
        }

        private bool ProductExists(int id)
        {
            return _context.Product.Any(e => e.Id == id);
        }
    }
}
- Run the following command to add migration and update database
PM> Add-Migration init-mig
PM> Update-Database -Verbose
- Add a docker file in the root directory with the following code.
Dockerfile
#See https://aka.ms/containerfastmode to understand how Visual Studio uses this Dockerfile to build your images for faster debugging.

FROM mcr.microsoft.com/dotnet/aspnet:6.0 AS base
WORKDIR /app
EXPOSE 80
EXPOSE 443

EXPOSE 8011
ENV ASPNETCORE_URLS http://*:8011


ENV ASPNETCORE_ENVIRONMENT=Development


FROM mcr.microsoft.com/dotnet/sdk:6.0 AS build
WORKDIR /src
COPY ["/Catalog.API.csproj", "Catalog.API/"]
RUN dotnet restore "Catalog.API/Catalog.API.csproj"

WORKDIR "/src/Catalog.API"
COPY . .
WORKDIR "/src/Catalog.API"
RUN dotnet build "Catalog.API.csproj" -c Release -o /app/build

FROM build AS publish
RUN dotnet publish "Catalog.API.csproj" -c Release -o /app/publish

FROM base AS final
WORKDIR /app
COPY --from=publish /app/publish .
ENTRYPOINT ["dotnet", "Catalog.API.dll"]
Step 7: Push image to docker hub
- Go to the project root directory where docker file exists.
- Login to docker desktop.
- Use the following command to check login status.
docker login
- Use the following command to build container image.
docker image build -t mahedee/catalog:1.0.4 .
Format: docker image build -t {username}/{imagename}:{tag} .
Note: There is a dot at the end of the command.
- Use the following command to check already created image
docker images
- Push image to docker hub using following command.
docker image push mahedee/catalog:1.0.4Format: docker image push {username}/{imagename}:{tag}
- Now login to hub.docker.com and you will see new image inside repository (https://hub.docker.com/repositories)
Step 8: Configure Pod for Kubernetes
- Create a pod manifest file name pod.yml in deploy/k8s folder with below code.
apiVersion: v1
kind: Pod
metadata:
  name: catalog-pod
  labels:
    app: web-api

spec:
  containers:
    - name: web-ctr
      image: mahedee/catalog:1.0.4
      ports:
        - containerPort: 8011
- Go to the the directory where pod.yml file resides and run the below command.
kubectl apply -f pod.yml
Output:
pod/catalog-pod created
- State of the created pods can be checked by the below command.
kubectl get pods --watch
- If you need to delete a pod write below command
kubectl delete pod catalog-pod
or
kubectl delete -f pod.yml
Step 9: Expose kubernetes service
- Create a service pod using the following command
kubectl expose pod catalog-pod --name=catalog-svc --type=NodePort --port=8011
Output
service/catalog-svc exposed
- Check created services using following command
kubectl get svc
- To see the details of the service, use the following command
kubectl describe svc catalog-svc
Output:
Name:                     catalog-svc
Namespace:                default
Labels:                   app=web-api
Annotations:              <none>
Selector:                 app=web-api
Type:                     NodePort
IP Family Policy:         SingleStack
IP Families:              IPv4
IP:                       10.101.161.222
IPs:                      10.101.161.222
LoadBalancer Ingress:     localhost
Port:                     <unset>  8011/TCP
TargetPort:               8011/TCP
NodePort:                 <unset>  32461/TCP
Endpoints:                10.1.0.10:8011
Session Affinity:         None
External Traffic Policy:  Cluster
Events:                   <none>
- From the above output, you can see the node port is exposed on 32461 port.
- Now browse the application using the following URL: http://localhost:32461/swagger/index.html
Step 10: Configure Kubernetes dashboard
- Dashboard UI is not configured by default. To configure, run the following command.
kubectl apply -f https://raw.githubusercontent.com/kubernetes/dashboard/v2.3.1/aio/deploy/recommended.yaml
- You can check the namespaces with the below command.
kubectl get ns
Output:
NAME                   STATUS   AGE
default                Active   4d5h
kube-node-lease        Active   4d5h
kube-public            Active   4d5h
kube-system            Active   4d5h
kubernetes-dashboard   Active   123m
If you see the above output, we can see a new namespace name - kubernetes-dashboard.
- You can check if any pods are running on newly created namespace with the below command.
kubectl -n kubernetes-dashboard get pods -o wide
- Check service type with the following command.
kubectl -n kubernetes-dashboard get svc
Default service type is ClusterIP and it cannot be access from outside the cluster. We don’t need to modify Service file because we are not going to expose the cluster to the outside world.
- Create a file name - dashboard-adminuser.yaml and add the following code in dashboard-adminuser.yaml
dashboard-adminuser.yaml
apiVersion: v1
kind: Namespace
metadata:
  name: kubernetes-dashboard
---
apiVersion: v1
kind: ServiceAccount
metadata:
  name: admin-user
  namespace: kubernetes-dashboard
---
apiVersion: rbac.authorization.k8s.io/v1
kind: ClusterRoleBinding
metadata:
  name: admin-user
roleRef:
  apiGroup: rbac.authorization.k8s.io
  kind: ClusterRole
  name: cluster-admin
subjects:
- kind: ServiceAccount
  name: admin-user
  namespace: kubernetes-dashboard
- As we are using new cluster binding so we need to delete the existing Cluster Binding section from kubernetes-dashboard file, otherwise an error will return. Use below command to delete.
kubectl delete clusterrolebinding kubernetes-dashboard
- Go to the directory where dashboard-adminuser.yaml is resides and execute the following command.
kubectl apply -f dashboard-adminuser.yaml
- Now we need to find token we can use to log in. Execute following command:
kubectl -n kubernetes-dashboard get secret $(kubectl -n kubernetes-dashboard get sa/admin-user -o jsonpath="{.secrets[0].name}") -o go-template=""
- Copy the genereted token and open another terminal type the following command.
kubectl proxy
-
Now, use below URL to access the dashboard. http://localhost:8001/api/v1/namespaces/kubernetes-dashboard/services/https:kubernetes-dashboard:/proxy/
-
Select token of the UI and pest copied token and click sign in. You will see the dashboard screen.
Some Kubectl commands
kubectl version --short // Check Kubectl version

docker info

kubectl cluster-info

docker container ls

kubectl get nodes	//shows list of nodes

kubectl apply -f pod.yml

kubectl get pods --watch

kubectl get pods -o wide

kubectl describe pods my-pod // to see the details about pod

kubectl delete -f pod.yml // delete already created pod by pod.yml

kubectl delete pod mypod // delete particular pod

kubectl delete svc mysvc // delete particular service

kubectl expose pod my-pod --name=my-svc --type=NodePort // create a service pod

kubectl get svc // check created services

// deploy kubernetes dashboard using the following command
kubectl apply -f .\recommended.yaml.txt

// Verify the running pod
kubectl.exe get -f .\recommended.yaml.txt

// Generate token for the dashboard

((kubectl -n kube-system describe secret default | Select-String "token:") -split " +")[1]

kubectl proxy.
Some Docker commands
docker login

docker image build -t mahedee/demoapp:1.0.0 .

docker image push mahedee/demoapp:1.0.0 .

docker images

docker images ls